LEAP New Features List
Find Tool Improvements
Find tool link is more visible / Search for hold requests
Holds Queue
Access the holds queue from the find tool, bib record, and item record / Change hold request position / Place a hold request from the holds queue
Check In – In House Mode
Check In - Inventory
Merge Patron Records
Manage Multiple Items at Check-in
Ability to change fields in the item record at check-in
Circulate Uncataloged Items
Reprint Past Receipts
Ability to reprint receipts
Item Record Blocks and Notes Icon
Blocks and notes icon is red if any are present
Alert When Patron Receives Only eReceipts
Create, Copy, and Modify Item Records
Cataloging Record Sets Implemented
Ability to search and modify bib and item records sets
Item Record Sets
Bibliographic Record Sets
Find Tool Updates
Search for record sets / Access from record set
Item Record Workform Updates
Action menu includes copy option / “More” menu added / Details view Editable fields / New source and donor view / New record sets view / Info icon
Hold Request Updates
Added information icon and properties window
Bibliographic Record Workform Updates
Added information icon and properties window / Editable header / fields Action menu / Item button on items view / New headings view / New records sets view
Check In Workform Updates
Added count of checked-in items and branch and collection abbreviations
Picklist Updates
New item history action
Declare Lost Item and Resolve Lost Item Updates
Other Improvements
Default setting for special loans / Notices view on item records / Prevent repeating holds message for outreach patrons / Held items displayed / Link to patron record from item record history / Hold request form updated / Patron user-defined fields display / Picklist scroll bar improved / Picklist counts added
Leap Updates
Find Tool Improvements
The following improvements were made to the Leap Find Tool:
- The Find Tool link is now more visible.
- Search results in the Leap find tool are now filtered by the user's permission.

- The Find Tool display is larger on a tablet (iPad) or desktop.
- You can now search for hold requests.
Search for Hold Requests
You can now search for hold requests using the Leap Find Tool. When you search for hold requests in the Leap Find Tool, you can select search qualifiers and filters to limit the search results. The Qualifier list on the initial Find Tool view and the filter list on the Search filters view contain the following limiters:
- Activation date
- Author
- Expiration date
- Format
- ISBN
- ISSN
- Item barcode
- Patron barcode
- Patron code
- Patron name (First Last)
- Patron name (Last, First)
- Patron's registered library
- Pickup library
- Request date
- Request ID number
- Status
- Title
- Tracking
- Unclaimed date
The qualifiers and filters can be used in combination to further limit the search results. For example, you can search by the patron's pickup library and apply a filter to limit the results to hold requests with an Active status.
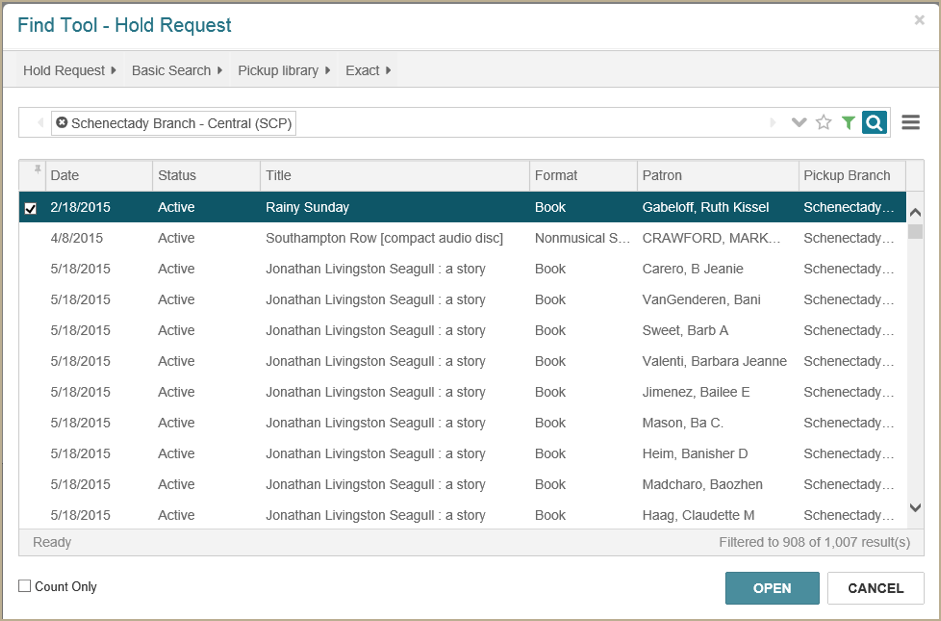
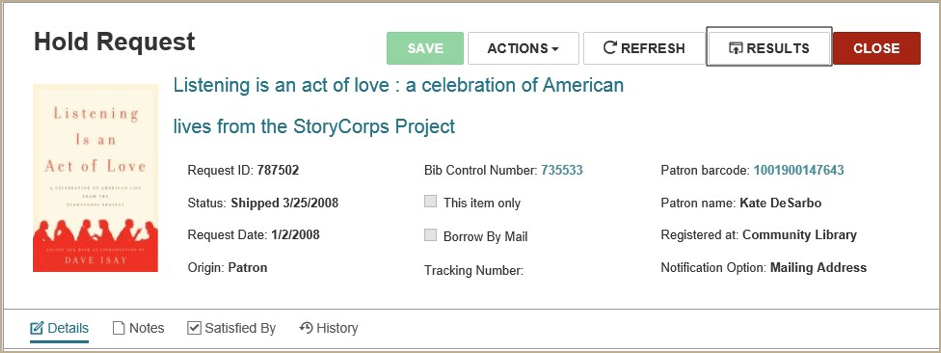
When you select a hold request in the Find Tool results list, the Hold Request workform opens. To return to the Find Tool results list, select RESULTS.
Holds Queue
-
Accessing the Holds Queue
You can access the new Leap Holds Queue from the following locations:
-
The Find Tool
Select Utilities | Holds Queue to open the Find Tool and search for the requested title.

-
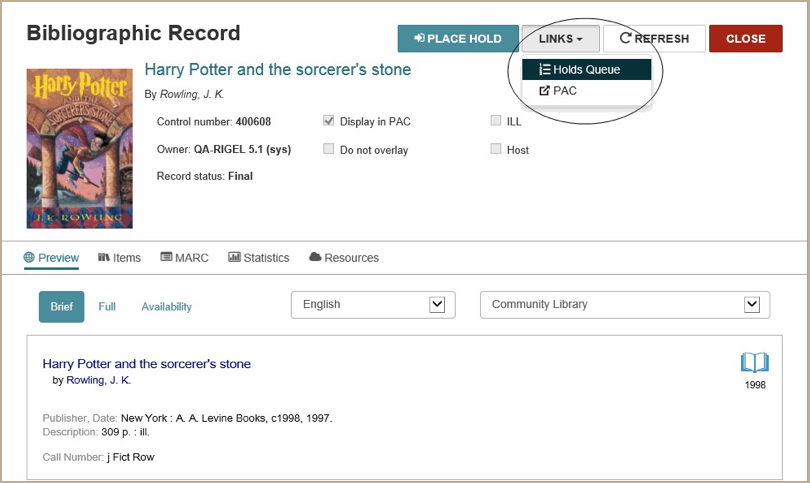
The Bibliographic Record
Open the requested title in the Bibliographic Record workform and select LINKS | Holds Queue.
-
The Item Record
You can select LINKS | Holds Queue on the Item Record workform.

The Holds Queue displays the following columns of information (from left to right) for each hold request placed on the title:
- Position - The position of the hold in the queue
- Patron name - The patron's last name and first name
- Patron branch - The branch at which the patron is registered
- Status - The status of the hold request
- Pickup branch - The branch designated as the patron's pickup branch
- Volume - If there is volume information for the title, it is displayed
- Issue - If the held item is linked to an issue, the information is displayed
- Request date - The date the patron placed the hold request
Expiration date -The hold expiration date

If you accessed the Holds Queue by searching for the requested title in the Find Tool, you can select the return button to go back to the Find Tool search results.

If you accessed the Holds Queue by linking from either the Bibliographic Record or Item Record workform, you return to that workform when you select CLOSE on the Holds Queue.
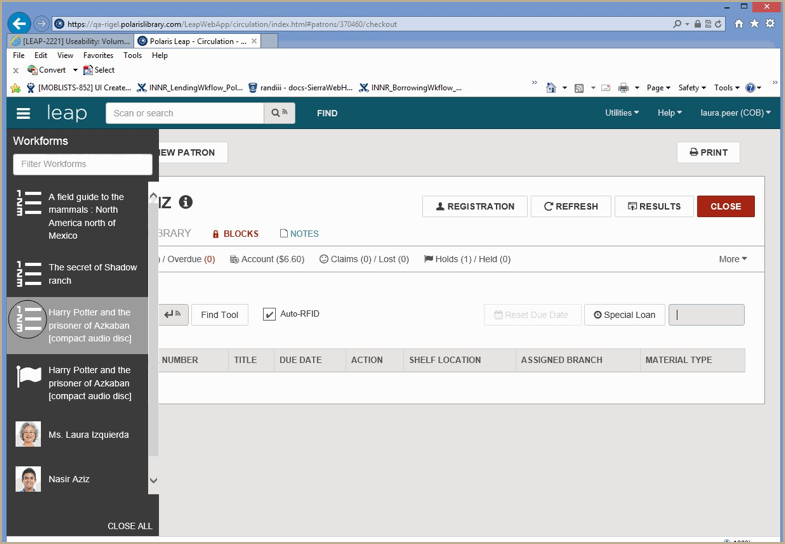
When the Holds Queue is still open and you open another workform, you can return to the Holds Queue workform from the workform tracker.
-
-
Change the Position of Hold Requests in the Queue
To change the position of a hold request in the Leap Holds Queue:
1 Select Utilities | Holds Queue to open the Find Tool and search for the requested title.
-
2 Select the title to open the Holds Queue workform.
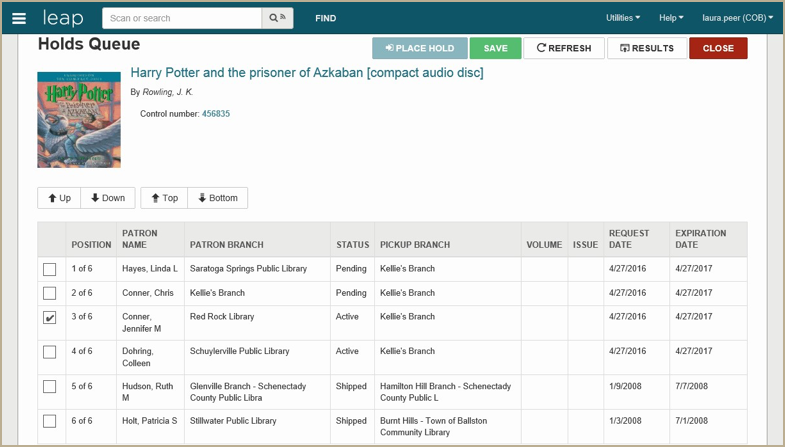
3 Select the checkbox next to the hold request, and select the Up, Down, Top, or Bottom button to move the hold request in the list.
The position of the hold request is changed in the queue.
-
Place a hold request from the Holds Queue
To place a hold request from the Holds Queue:
- 1 Select the title the patron wants to request.
-
2 Select the Place Hold button.
If no patron records are currently open, the Find Tool opens.
If patron records are open, the Select a patron dialog box opens where you can select the patron to place the hold, or select FIND TOOL... to search for another patron.
3 Select the patron to place the hold.
Check In - In House Mode
You can use the In House mode of the Leap Check In workform to check in items that did not circulate, but were used by patrons while in the library. For more information on In House mode, see Polaris online Help.
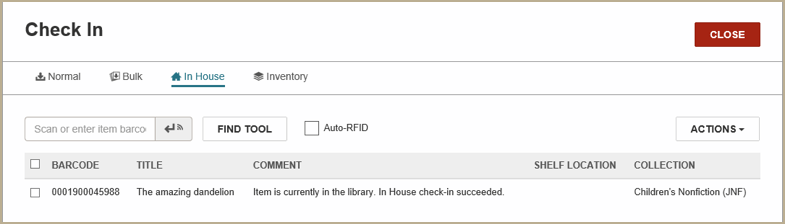
To use the In House mode for Check In:
1 Open the Check In work form, and select In House.
-
2 Scan each item's barcode, or if the Auto-RFID check box is selected, place the items on the reader pad.
As each item barcode is scanned or RFID tag is read, the item appears in the list with the comment, Item is currently in the library. In house check-in successful.
The item's history is updated with Checked in via In House. If any checked in items have blocks or satisfy a hold request, a message appears.
Check In - Inventory
You can use the new Inventory mode on the Leap Check In workform to take an inventory of items on the shelf by scanning item barcodes or reading RFID tags. Items are not checked in when you use the Inventory mode in Leap; it is used to update the Last inventory date field in the item record. For more information on Inventory mode, see Polaris online Help.
To update the last inventory date for item records:
1 Open the Check In workform, and select Inventory.
-
2 Scan each item's barcode, or if the Auto-RFID check box is selected, place the items on the reader pad.

As each item barcode is entered, or RFID tag is read, the item barcode, status, and title appear with the comment Inventory update successful.
The item's inventory date is updated, and a row is added to the item record history with the note Inventory date was updated.
If any checked in items satisfy a hold request, a message appears.
Merge Patron Records
You can now merge duplicate patron records using Leap.
To merge two patron records using Leap:
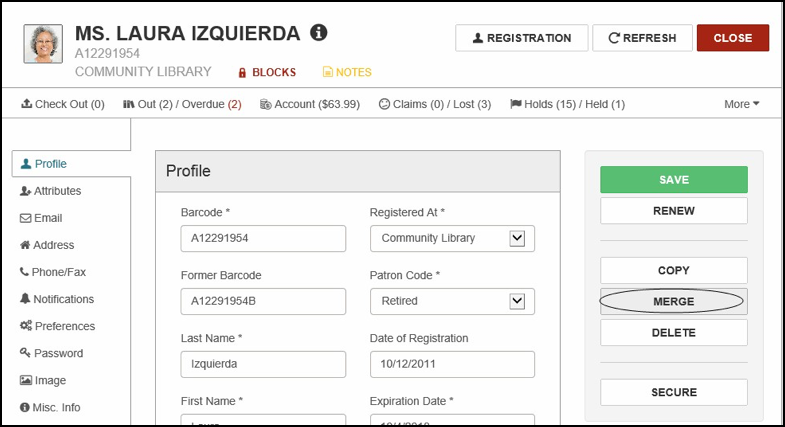
1 Search for and select the patron’s primary record (the record that you want to keep). The patron’s record opens.
-
2 Select REGISTRATION to open the Patron Record | Registration view.
-
3 Select MERGE.
The Merge Patron Records dialog box appears.
-
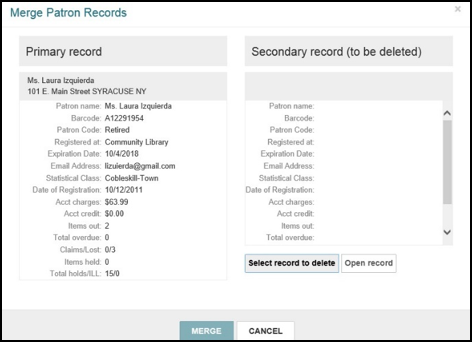
4 Choose Select record to delete.
The Find Tool opens.
-
5 Search for and select the secondary record (the record you want to delete), and select OPEN.
The primary patron record’s details appear on the left side of the dialog box, and the secondary record’s details appear on the right side. The details are based on the settings in the Patron Services Administration parameter Check Out: Optional Patron Data. If you want to review the secondary record before merging, select Open record.
-
6 Select MERGE to merge the records.
A message box asks if you want to continue with the merge.
-
7 Select CONTINUE.
All the information in the primary record is saved, the secondary record is deleted, and the following data is copied from the deleted record into a single updated record.
- Barcode - Copied to the Former barcode field.
- Blocks - Copied to the Free Text and Library Assigned fields.
- Notification history - All previously-generated notices are copied.
- Items out - The list of items out.
- Hold requests - Active, Inactive, Pending, Located, Canceled, Not sup- plied, and Out to patron holds and ILL requests with a status of Held, Shipped, or Unclaimed.
- Claimed and lost items - The claimed and lost item counts are totaled in the saved record.
- Patron account - The charges and credits are totaled on the saved record. The YTD and Lifetime Circ as well as the new YTD and Lifetime You Saved amounts are also totaled on the saved record.
Notes - The notes from the deleted record are appended to the notes on the saved record and separated by a blank line. A note indicates the record was merged and provides the barcode of the deleted record and the date/time that the merge occurred.
In addition, a new transaction: Modified via Leap merge is recorded for the saved record.
Manage Multiple Items at Check-in
If you have the required Polaris permissions, you can now modify multiple items at check-in from Leap.
To modify multiple items at check-in:
1 Select CHECK IN.
2 If you want to change the display, choose Normal, Bulk, or In House.
3 Select the check boxes next to the items you want to modify. If you want to modify all items in the list, select the check box in the list header.
-
4 Select ACTIONS, and select Manage Item Record from the drop-down list.
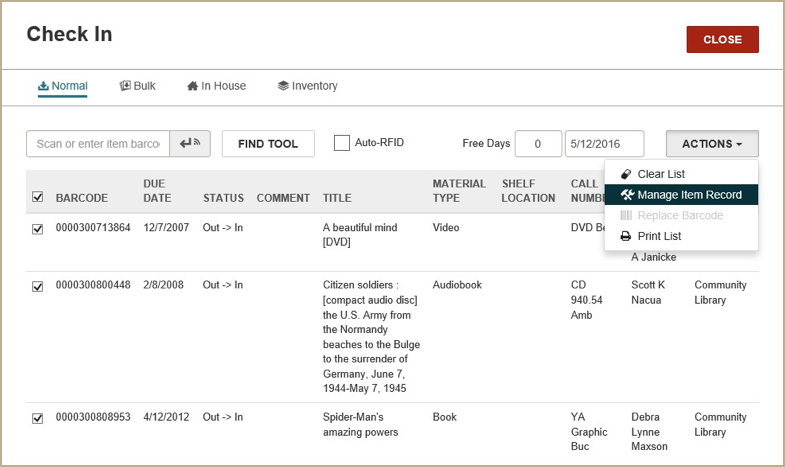
The Manage Item Record dialog box opens.
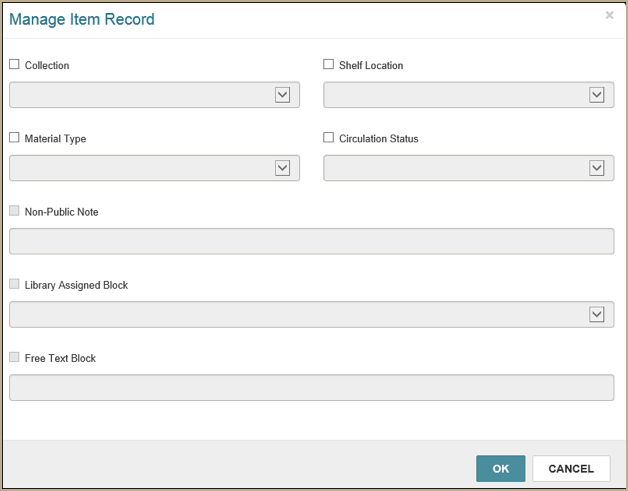
5 Select the check box next to each item record field you want to change, and select an option for the field in the drop-down list box.
-
6 When you have selected all the changes to make to the selected items, select OK to close the Manage Item Record dialog box and make the changes.
The message Item record(s) updated successfully appears if all the changes can be made to all the selected records. A transaction is added to the database for each changed item. In addition, the Item Record workform, History view displays a row for each change that was made to the item record, for example Assigned collection modified via Manage Item dialog from Check In.
If one or more of the selected records cannot be changed, the following types of messages appear:
Locked item [barcode] cannot be modified from check-in. This message appears if the item record is locked (open) in either the Polaris staff client or Leap.
Item [barcode] must be in and from this branch. This message appears if the item status has been updated to a status of other than In but the Check In workform displays an In status, or the item's assigned branch has been changed but it still displays as the logged-on branch in the Check In workform.
Quick-circ item [barcode] cannot be modified from check-in. This message appears if the item is a Quick-circ item.
ILL item [barcode] cannot be modified from check-in. This message appears if the item was created via Polaris ILL.
Circulate Uncataloged Items
If you have the required permissions, you can now create on-the-fly records to circulate uncataloged items in Leap.
To create on-the-fly records at check-out:
-
1 Scan the item's barcode, and if the barcode is not recognized, the Item not found dialog box opens.
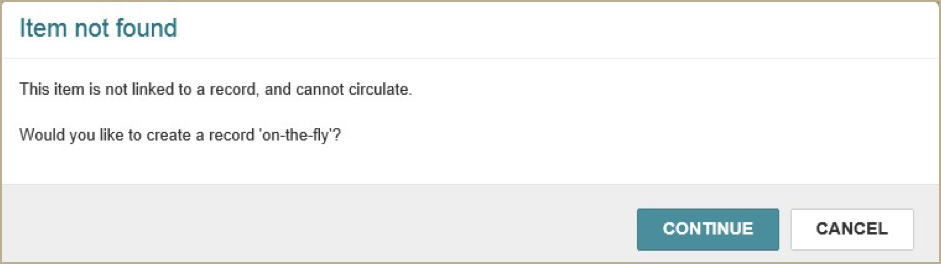
-
2 Click CONTINUE to create a record 'on-the-fly'. The Brief Item Entry dialog box appears.
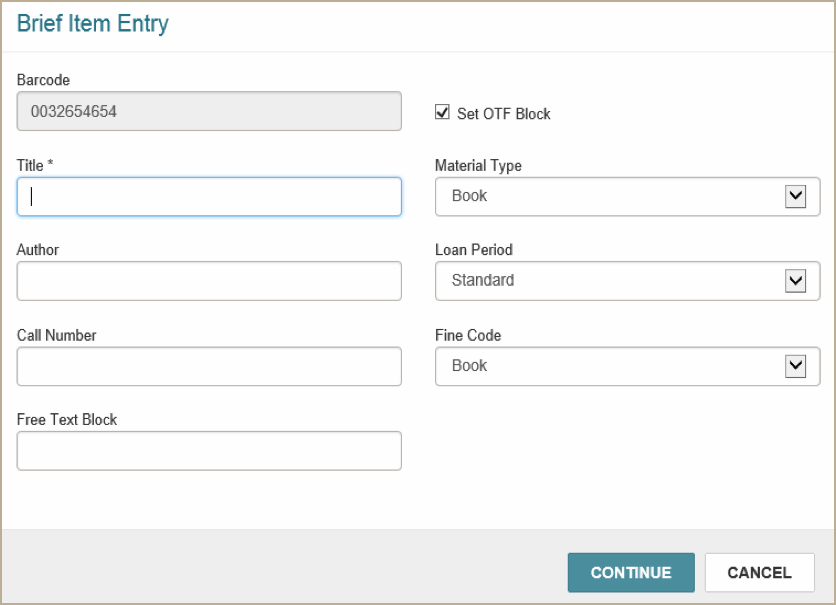
-
3 Enter the Title, Author, Call Number, and Free Text Block. Only the title is required to create an on-the-fly item.
-
4 If you want to change the default selections, choose a different Material Type, Loan Period, or Fine Code.
-
5 If you want to check out the item without setting the on-the-fly block, clear the Set OTF Block check box.
-
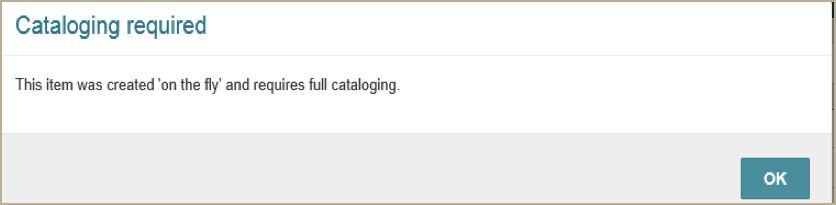
6 Select CONTINUE.
If the Set OTF Block check box is checked, a message informs you that the brief item was created and that the item requires full cataloging. If the Set OTF Block check box is not checked, the item is checked out without the OTF block.
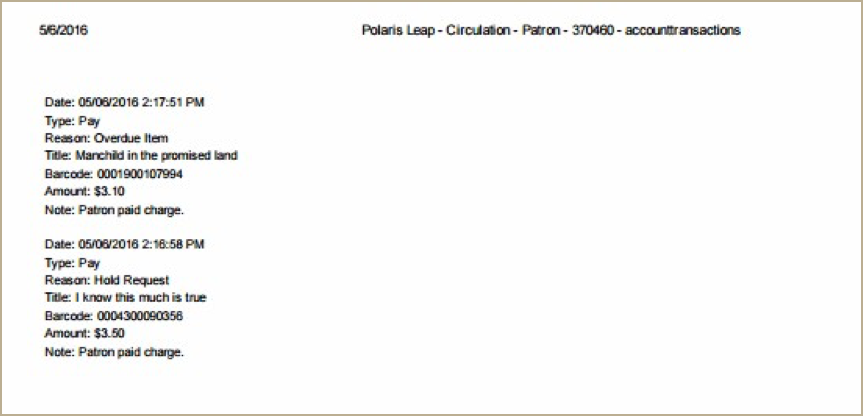
Reprint Past Receipts
You can now reprint past receipts for patrons.
To print receipts that were printed previously:
-
1 Open the Patron record and go to the Account Summary | Transaction Summary view.
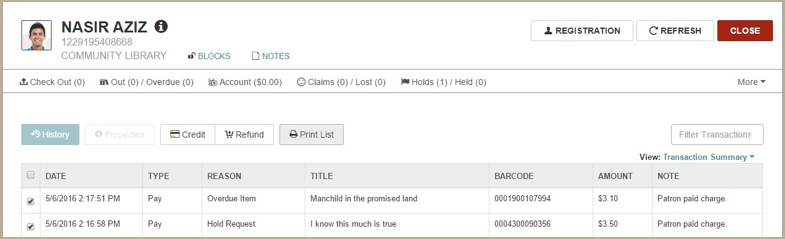
-
2 Select the transactions for which you want to reprint receipts.
-
3 Select Print List.
The receipts are printed.
Other Improvements
The following additional improvements were made to Leap:
-
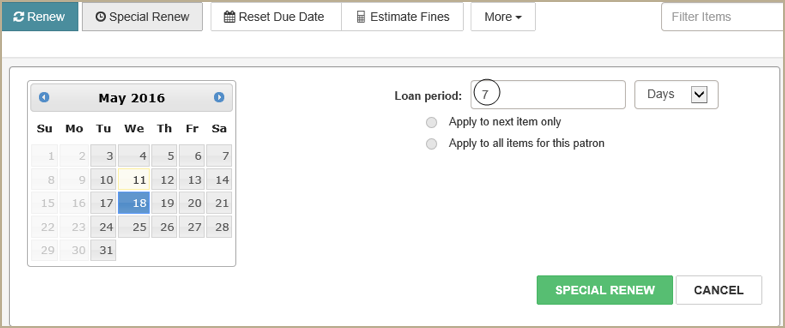
Default settings for Special Loan and Special Renew
The Special Loan (in Check Out and Settings) and Special Renew (in Items out) options now display the default value of 7 in the text field for the Loan period.
-
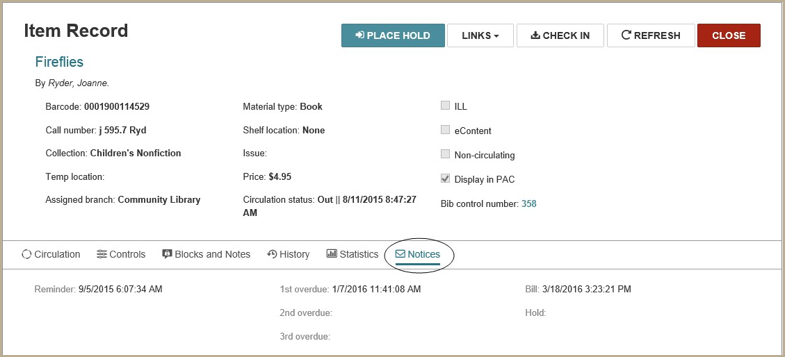
New Notices view on the Item Record
You can use the new Notices view on the Item Record workform to see when overdue or hold notices were sent for the item.
-
Prevent repeating holds messages when checking in items held for Outreach patrons
When you check in an item in Leap and a message indicates the item is being held for an outreach patron, you can select the Do not show this message to me again option to prevent the same message from displaying again during your logged-in session.
-
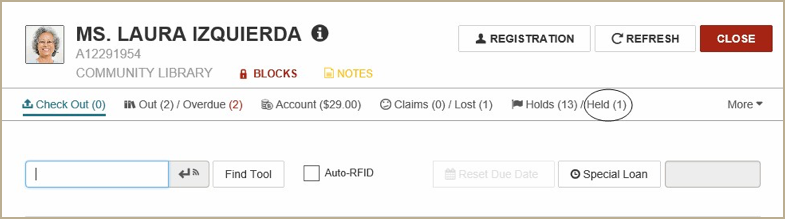
Number of held Items is displayed in Patron Record view bar
When you are checking out items to a patron, you can now see the number of items that are being held for that patron.
-
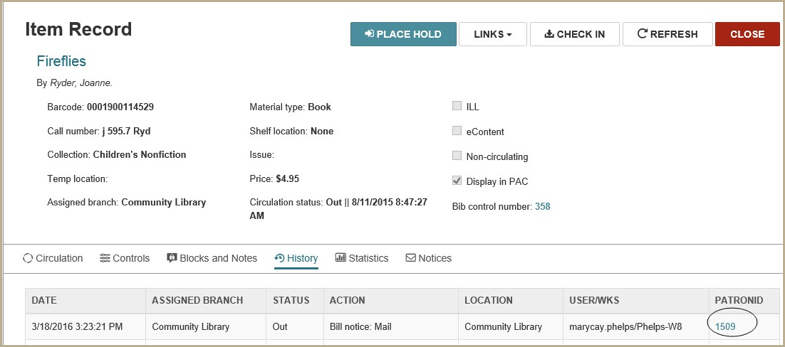
Link to a patron record from the Item Record History view
You can now link to the patron record by clicking the patron ID number in the PatronID column on the Item Record | History view.
-
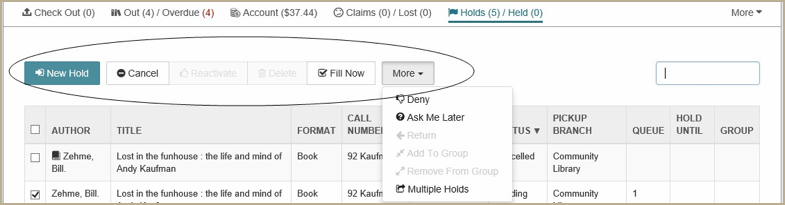
Action buttons and options reordered on the Patron Record Holds view
The Patron Record | Holds view was modified so that the buttons for the most common actions are visible when you open the Hold view, and the options for less common actions are under the More menu.
-
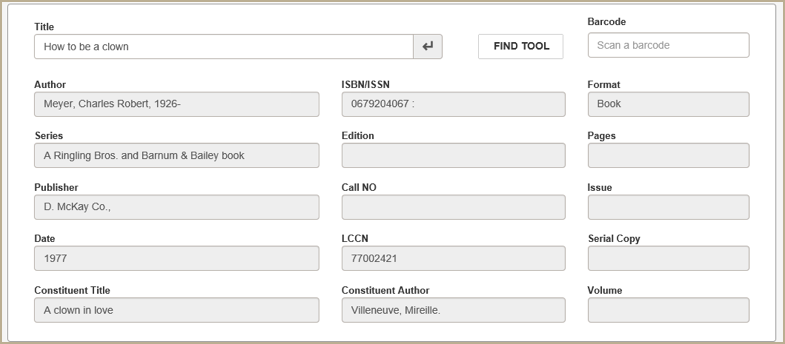
Create New Hold Request form updated
The fields were modified and reordered on the Create New Hold Request form, and the Tracking number field was replaced by the Volume field. In addition, the Constituent title and Author fields appear only for Bound-With titles.
-
User-Defined Fields (UDFs) display in patron information pop-up
You can now see a patron’s user-defined fields on the Info pop-up if your organization has selected these fields for display.
-
Picklist scroll bar improvements
Scrolling was improved for the Picklist so that the action bar and filter remain visible while scrolling through the list of items.

-
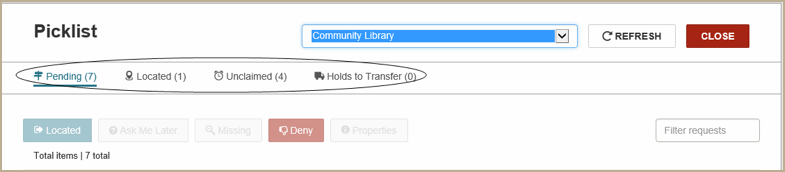
Picklist counts were added to the view bar
When you open the Picklist, the totals are displayed for each view for the selected branch. These counts are updated as hold requests change statuses.
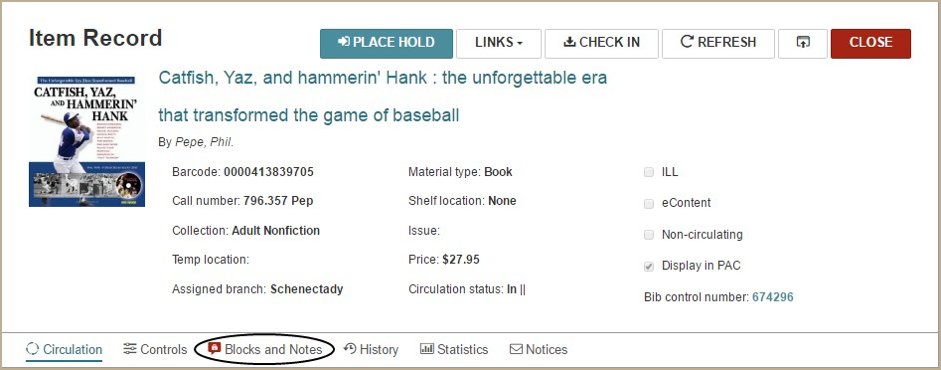
Item Record Blocks and Notes Icon
The Blocks and Notes view bar icon appears in red if blocks or notes are present in the record.
Alert When Patron Receives Only eReceipts
If eReceipts are enabled for the branch, the patron is set up to receive only eReceipts, and the workform is set to print receipts only if no eReceipt is sent, an alert message appears in Leap when checking in, checking out, or paying fines for that patron. This informs the staff member that there is no need to wait for a receipt to be printed for that patron.
When paying a fine from the Check In, Check Out, or Patron Status workform, the following message appears if the patron receives only eReceipts: eReceipt submitted for fine payment.
When checking out an item to a patron from the Check Out or Patron Status workform, the following message appears if the patron receives only eReceipts: eReceipt submitted for check out / renewal.
Create, Copy, and Modify Item Records
If you have the appropriate Polaris permissions, you can now create and modify item records in Leap.
When you create an item, the following permissions and profiles in Polaris Administration are checked:
-
Cataloging permissions:
- Item records: Create
- Item templates: Access
-
Cataloging profiles:
Bring price from bib to item record when link is made. If this profile is set to Yes, the price is copied according to the Item Create Price Hierarchy database table.
Bring call number fields from bib to item record when link is made. If this profile is set to Yes, the call number fields are copied according to the Item Create Call Number Hierarchy database table.
Default shelving scheme for new item and holdings records.
When you modify an item record in Leap, the following permissions are checked:
- Item records: Access
- Item records: Modify cataloging view. In Leap, this permission applies to the Controls view.
- Item records: Modify header. In Leap, this permission applies to the Details view.
- Item records: Modify notes and notices view. In Leap, this permission applies to the Blocks and Notes view; Notices is a separate view that cannot be edited.
- Item records: Modify source and acquisition view. In Leap, this permission applies to the Source and Donor view.
-
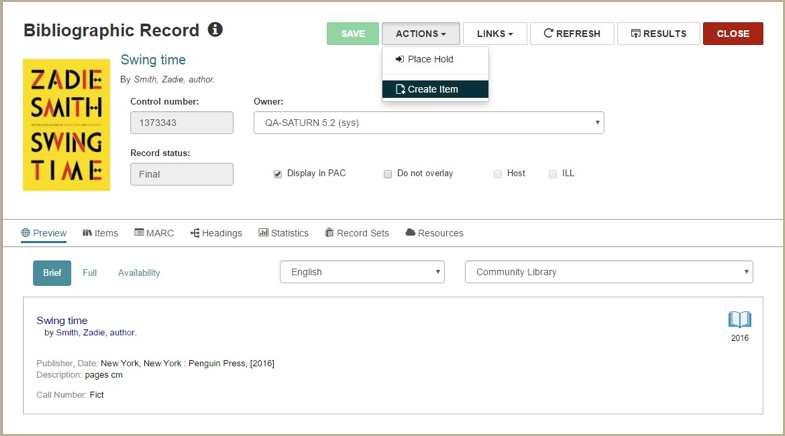
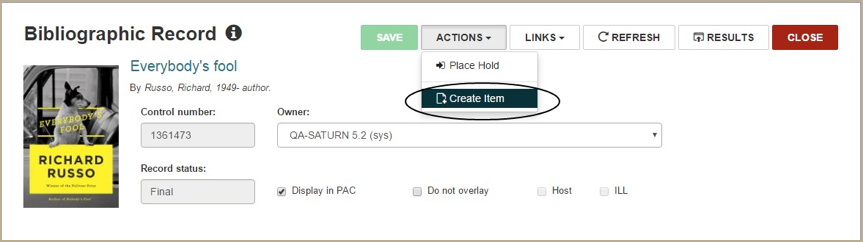
Create an Item from a Bibliographic Record
-
1 Open the Bibliographic Record workform.
-
2 Open the New Item Record workform:
-
Click ACTIONS | Create Item.
-
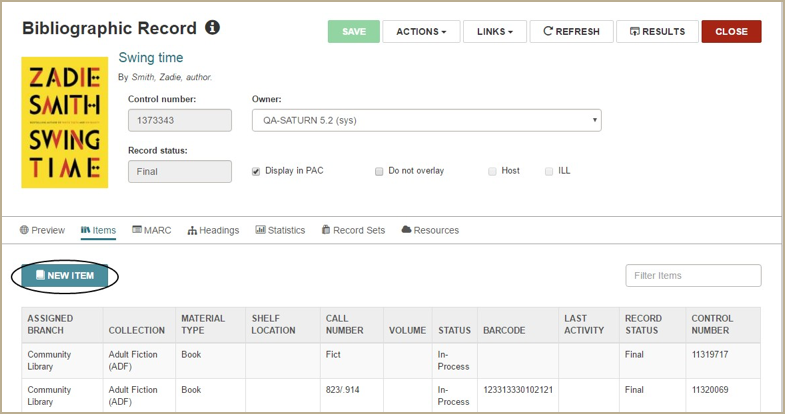
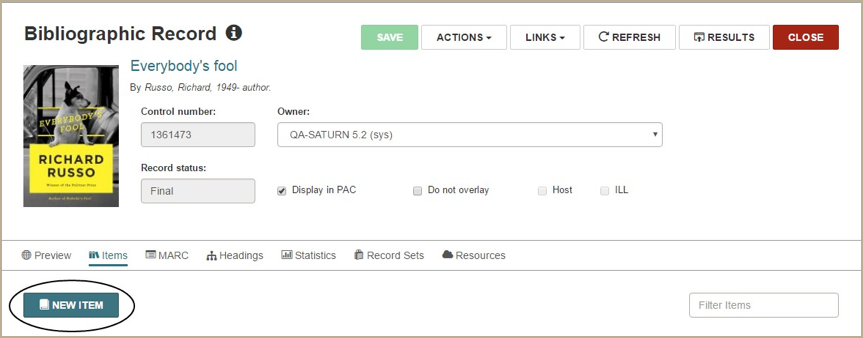
Or, click Items to go to the Items view, and select NEW ITEM.
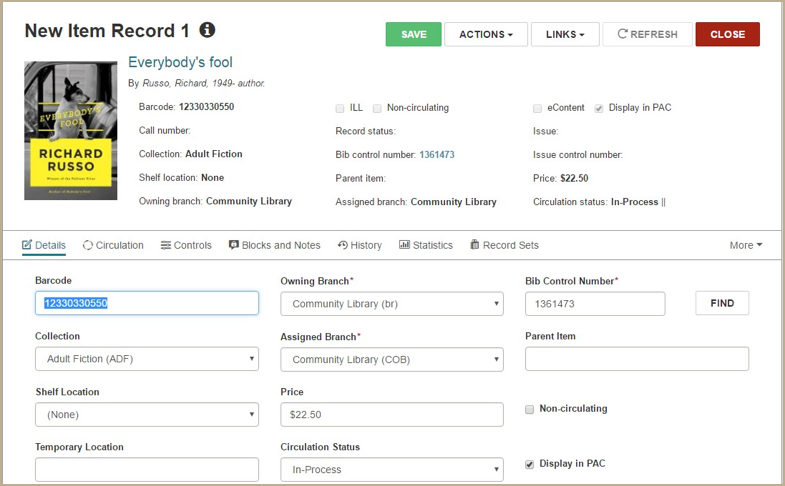
The New Item Record workform opens.
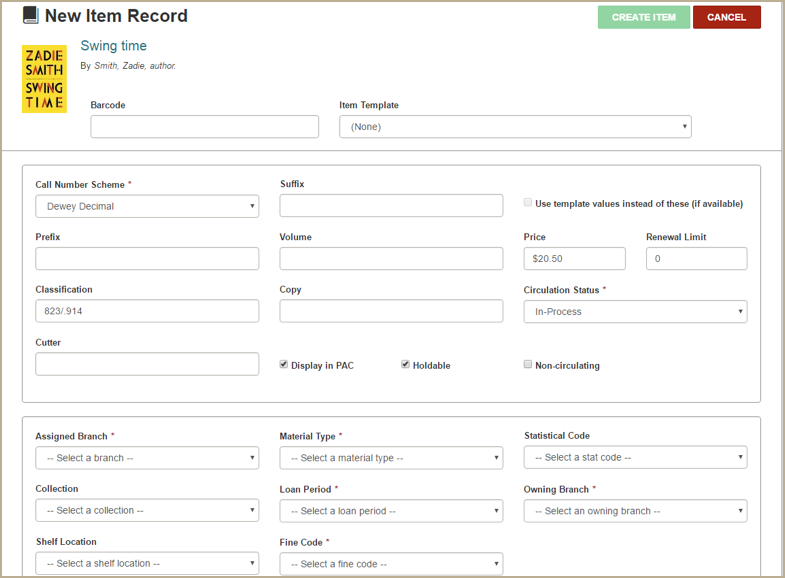
The fields in the New Item Record workform are displayed as follows:
The required fields are noted with red asterisks.
The call number scheme defaults to the shelving scheme set in the cataloging profile.
The values in the Classification and Cutter fields are copied from the bibliographic record if the appropriate tag is identified in the Item Create Call Number hierarchy database table, and the cataloging profile Bring call number fields from bib to item record when link is made is set to Yes.
The value in the Price field is copied from the bibliographic record if the appropriate tag is identified in the Item Create Price Hierarchy database table, and the cataloging profile, Bring price from bib to item record when link is made is set to Yes.
-
The template list contains the templates you have access to based on the template owner. If you select a template and select Use template values instead of these, the template values are not displayed, but the item is created with the alternate values from the template. When you create a new item record and select Use template values instead of these (if available), the following values, when present, are derived from the selected item template:
Call number scheme
Prefix
Classification
Cutter
Suffix
Volume
Copy
Price
Renewal Limit
Display in PAC
Holdable
Non-circulating
Circ status
-
-
3 Enter the item barcode and other required information.
-
4 Click CREATE ITEM.
-
-
Copy an Item Record
To create a new item record by copying an existing one:
1 Open the item record you want to copy.
-
2 Select ACTIONS | Copy.
If the item is for an electronic medium or the item is linked to a serial issue or standing order part, the option to copy the item record is not available.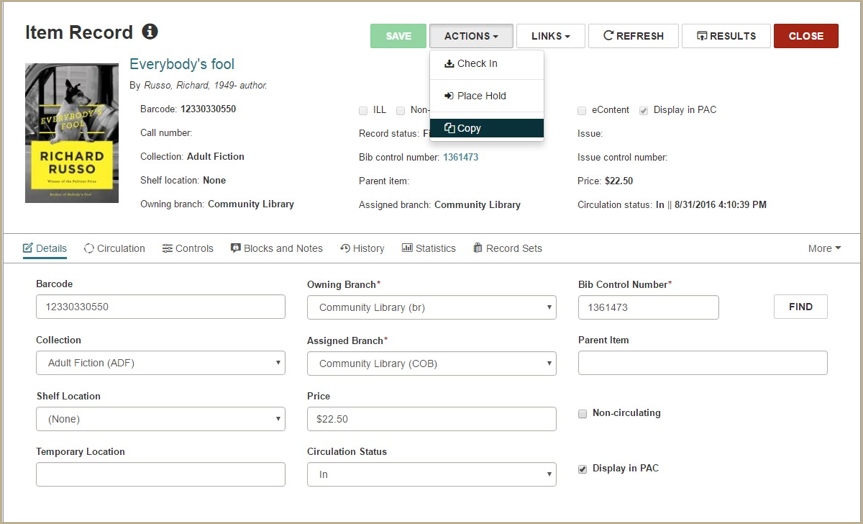
The new Item Record workform opens.
The following information and settings are copied from the original record:
-
Header - Most of the header information and settings are copied.
When you copy an item record, the Circulation status field in the New Item Record workform is filled automatically, but you can change it before saving the record.
If the Cataloging profile, Copied item records default to in-process, is set to Yes, the Circulation status field is set to In-process.
If the profile is set to No, the circulation status is retained from the copied record if it is: In, Missing, Withdrawn, Bindery, On-order, In-repair, or Unavailable. If the copied record has another circulation status, the Circulation status field in the New Item Record workform is set to In-process.
Circulation view - Renewal limit
Controls view - All the information and settings in this view are copied to the new item record.
Blocks and Notes view - All blocks and notes are copied to the new item record except the System Block.
History view - None
Statistics view - None
Record Sets view - None
Notices view - None
Source and Donor view - The information in the Funding Source field is copied; the other information on this view is not copied.
-
-
3 Enter or change information for the new item record.
-
4 Click SAVE.
When the item record is saved, the Properties window is updated.
-
Modify an Item Record
If you have the required Polaris staff client permissions to edit item records, you can now modify item records in Leap. The Item Record workform now includes a new Details view for editing header information and a new Source and Acquisitions view for viewing and editing acquisitions and donor information. In addition, you can now update fields on the Controls view and the Blocks and Notes view. When you update fields on the Item Record workform, click SAVE to save your changes.
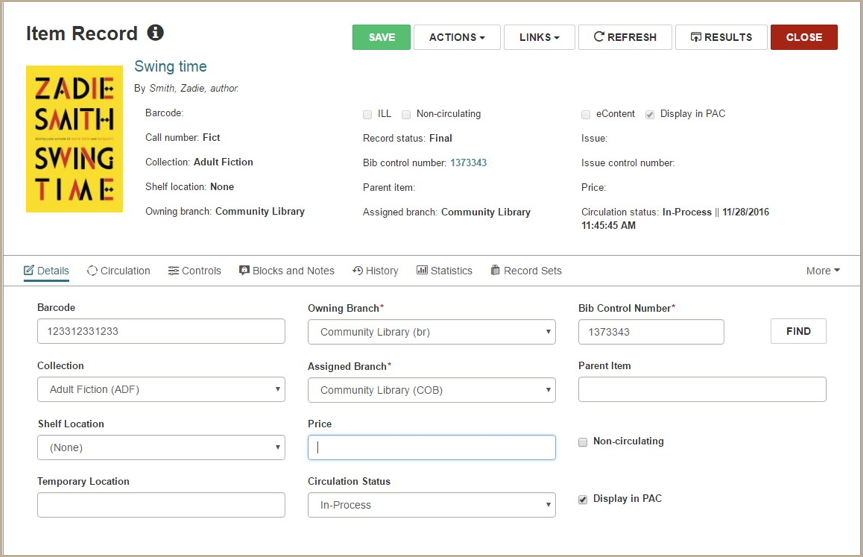
You can edit the following fields on the new Details view of the Item Record workform:
The following fields cannot be changed for electronic items: Non-circulating, Display in PAC, Barcode, Bib Control Number. The Find Tool is also disabled so you cannot search for and select a different bibliographic record.Barcode
Collection
Shelf Location
Temporary Location
Owning Branch
Assigned Branch
Price
-
Circulation Status
If you change the item to an Unavailable status, and it is the last copy linked to that bib, you can uncheck the Display in PAC box on the Bibliographic Record workform. Bib Control Number - Type a different bib control number or click FIND to search for and select a different bibliographic records.
Parent Item
Display in PAC
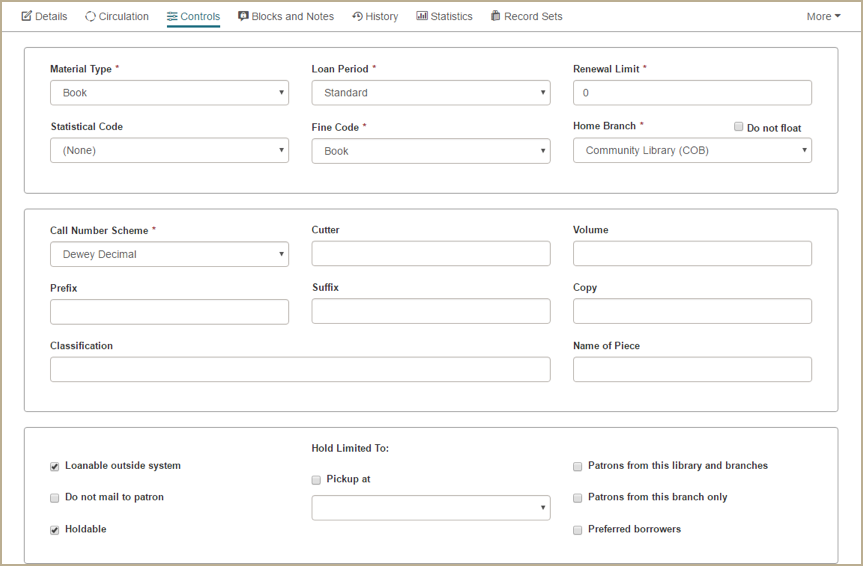
You can edit the following fields on the Controls view of the Item Record workform:
Material Type
Loan Period
Renewal Limit
Statistical Code
Home
Branch
Do not float
Call Number Scheme
Cutter
Volume Prefix
Suffix
Copy
Classification
Name of Piece
Loanable outside system
Do not mail to patron
Holdable
-
To indicate limits on the holds, use the check boxes under Hold Limited To:
Pickup at this branch
Patron from this library and branches
Patrons from this branch only
Preferred borrowers
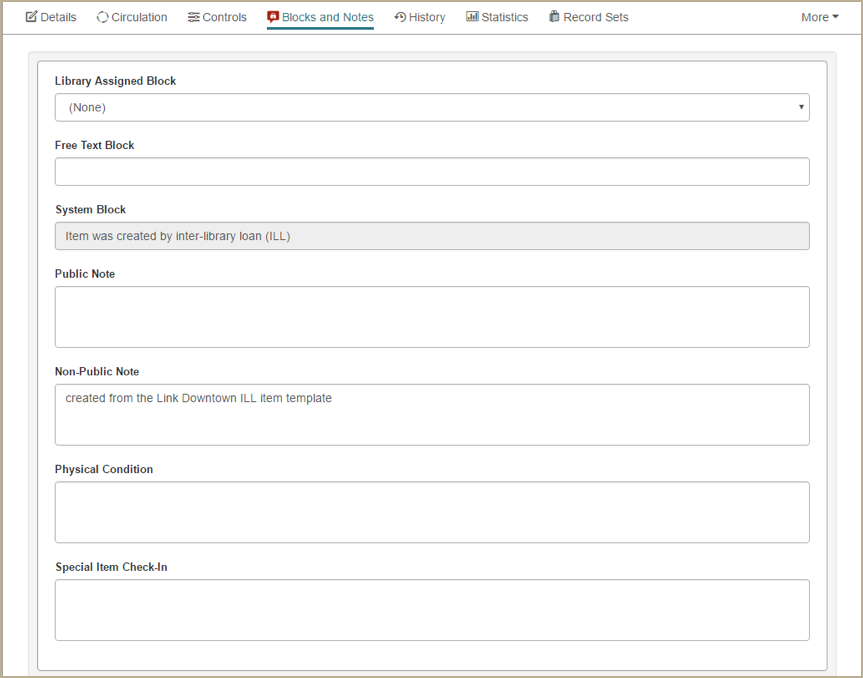
You can now edit the following fields on the Blocks and Notes view of the Item Record workform:
Library Assigned Block
Free Text Block
Public Note
Non-Public Note
Physical Condition
Special Item Check-In
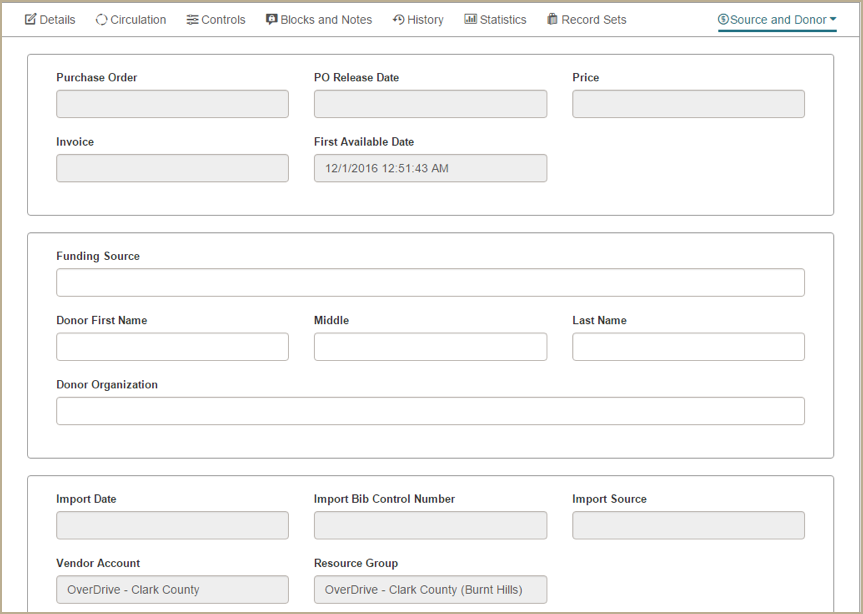
You can edit the following fields on the new Source and Acquisitions view of the Item Record workform if the item record was not created from a purchase order:
Funding source
Donor First Name
Middle
Last Name
Donor Organization
Cataloging Record Sets Implemented
If you have the required permissions in Polaris Administration, you can now search for, access, and modify bibliographic, item, and authority record sets in Leap.
Each cataloging record set is displayed in the appropriate workform according to record type. Regardless of the type, all record set workforms have the same header elements and a table view that lists the records. For information on a specific record set workform, see one of the following topics:
"Leap - Authority Record Sets"
To access any cataloging record set, you must have the permission: Cataloging record sets: Access.

When a record set is opened, an object lock is applied. The lock is removed when the record is closed. If you attempt to open a record set that another user has open, the following message appears: The record is being modified by [username] and the record set opens in a read-only mode with a locked indicator to the right of the Info icon. All actions are disabled except for: Refresh, Return to Results and Close. However, you can still filter the contents or link to an item record from a locked Item Record Set workform.
If a record set is large, all the records may not be retrieved at once. You can click MORE at the bottom of a record set workform to view more records.
If you select multiple records to add to the record set, and some of the records are duplicates, only the unique records are added; any records identified as duplicates are not added to the record set, and the number of unique records added is displayed.
When you modify a record set, a 9004 Record set modified transaction is logged.
-
Record Set Header Elements and Features
All Leap record set workforms have the following header elements:
-
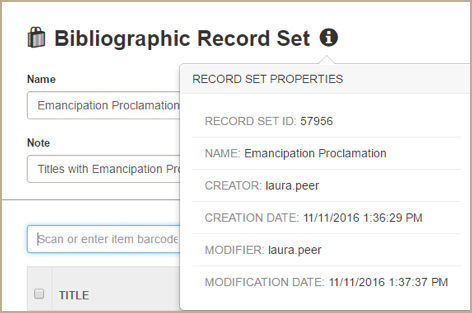
An Information icon that displays the record set properties: Record set ID, Name, Creator, Creation Date, Modifier, and Modification date.
SAVE, ACTIONS, REFRESH, RESULTS, and CLOSE buttons.
Editable fields - Name, Owner, and Notes
Display-only fields - Record Set ID and Record Count
-
-
Record Set Table View
Below the workform header is a table listing the records belonging to the record set. The table columns vary according to the record type, but all record set workform table views have the following elements and features in common:
ACTIONS menu - When at least one record is selected, you can select Remove Selected Records.
Filter Records box - Start typing in the box to immediately filter the list.
Sortable columns - Click a column header to sort the list.
Check boxes to select records - Click the check box to the left of the record, or click the check box in the column header to select all records.
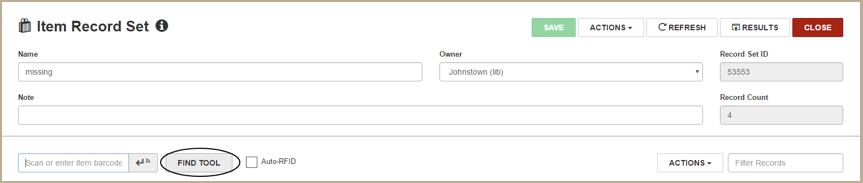
FIND TOOL button - Click the button to open the Find Tool and search for records to add to the record set. The Find Tool opens with the appropriate record type selected. When you select one or more records in the Find Tool results list, and click OPEN, the records are added to the record set except for any duplicate records.
Links to listed records - Click a record listed in the table to open it. When you close the record, you are returned to the record set.
If a record set is large, the table view lists a portion of the records, and at the bottom of the table, a count indicates the number of records displayed out of the total number of records in the record set. You can click MORE to load more records to the table display.

-
Modify a Record Set by Adding or Removing Records
If you have the required permissions, you can modify existing record sets in Leap by adding or removing records. As records are added or removed, the Record Count field is updated.
To remove records from any type of record set in Leap, select the records you want to remove, select ACTIONS above the table, and select Remove Selected Records. The records are removed from the record set, but the records remain in the Polaris database.
You can add records to any record set by clicking FIND TOOL from a record set and searching for the records using the Find Tool. When the Find Tool opens, the appropriate type of record is selected. In the Find Tool results list, you can select one or more records to add to the record set by clicking on the check boxes in the left column. When you select OPEN, the selected records are added to the record set. If any of the records being added already belong to the record set, a message informs you that duplicates were found and displays the number of records that were actually added.
For item and bibliographic record sets, you can add records by scanning an item barcode or RFID tag. If Auto-RFID is enabled for the workstation, and the Auto-RFID box is checked on the record set workform, records are added for any items that are automatically scanned. When an item is scanned from a bibliographic record set, the bibliographic record linked to the scanned item is added to the record set.
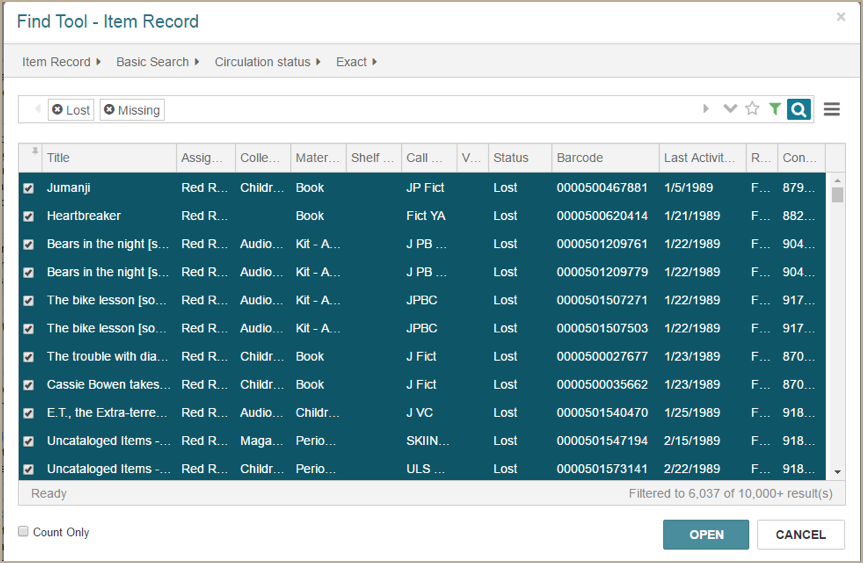
Item Record Sets
Item record sets are displayed in the Item Record Set workform.
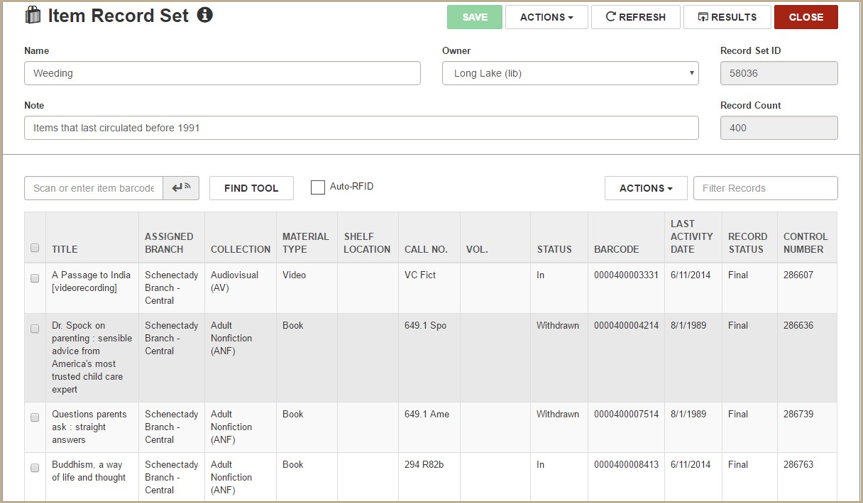
The following columns appear in the table view of the Item Record Set workform:
Title
Assigned Branch
Collection
Material Type
Shelf Location
Call Number
Volume
Status
Barcode
Last Activity Date
Record Status
Control Number
You can click on a record in this view to open the record in the Item Record workform. When you close the Item Record workform, you are returned to the Item Record Set workform.
Bibliographic Record Sets
You can now view and edit a bibliographic record set in the Bibliographic Record Set workform. If you have the required permissions, you can change the header information and add or remove records.
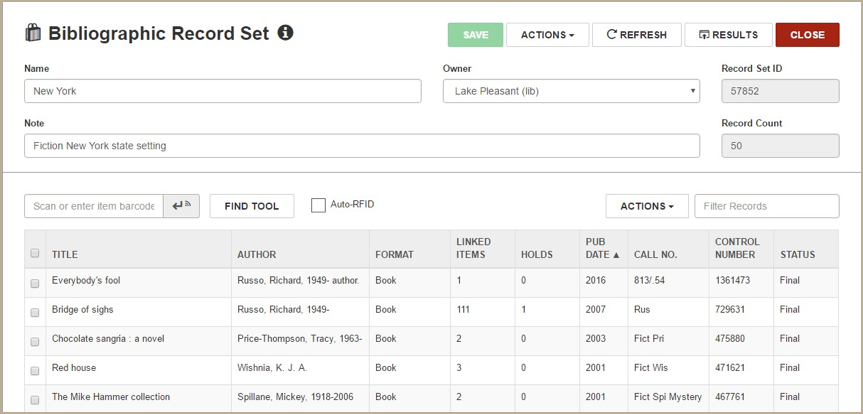
The bibliographic records belonging to the record set are listed in a table view with the following columns:
Title
Author
Format
Linked Items
Holds
Publication Date
Call Number
Control Number
Record Status
You can click on a record in this view to open the record in the Bibliographic Record workform. When you close the Bibliographic Record workform, you are returned to the Bibliographic Record Set workform.
You can see all the record sets to which a bibliographic record belongs in the new Record Sets view of the Bibliographic Record workform. See "Bibliographic Record Workform Updates".
Find Tool Updates
-
Search for Record Sets
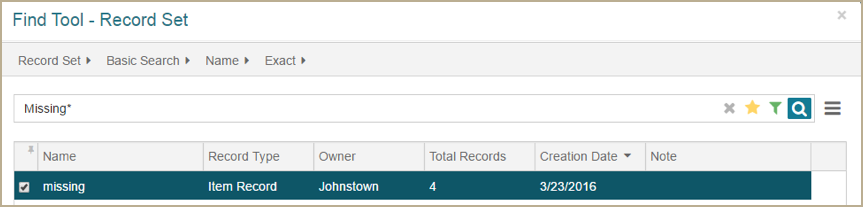
To search for record sets in Leap, open the Find Tool and select Record Set from the Search Database drop-down list. For more information on record sets in Leap, see "Cataloging Record Sets Implemented".
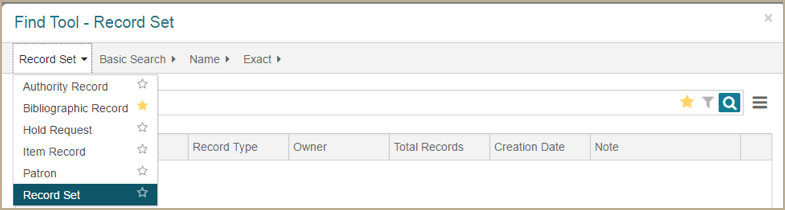
You can do a basic search, a power search, or an SQL search for record sets. If the selected search mode is Basic Search, you can search by Name (the default qualifier), Creation date, Owner, Record set ID, or Type.
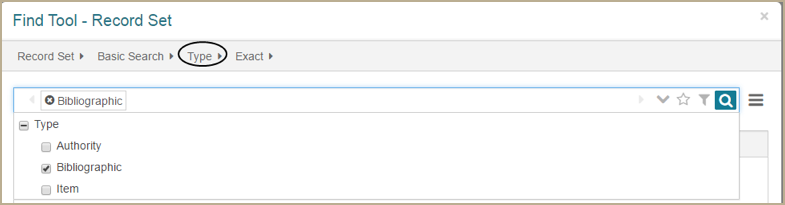
If you select Type from the Qualifier drop-down list, the record set type check boxes appear. You can select one or more check boxes.
To further narrow your record set search, you can apply one or more of the following search filters: Creation date, Name, Owner, Record Set ID, or Type.
The search results appear in the following default sortable columns: Name | Record Type | Owner | Total Records | Creation Date | Note
You can select Column Settings in the Options menu and change the columns and the order in which they appear.
You can save the search criteria, including filters and column settings, as your user default when searching for record sets.
-
Access the Find Tool from a Record Set to Add Records
You can click FIND TOOL from a record set to search for records and add them to the record set. See "Modify a Record Set by Adding or Removing Records".
Item Record Workform Updates
The Item Record workform now includes new views and editable fields, new menu options, a properties window, and other updates.
-
Actions Menu Includes Copy Option
The ACTIONS menu now includes a Copy option. See "Copy an Item Record".

-
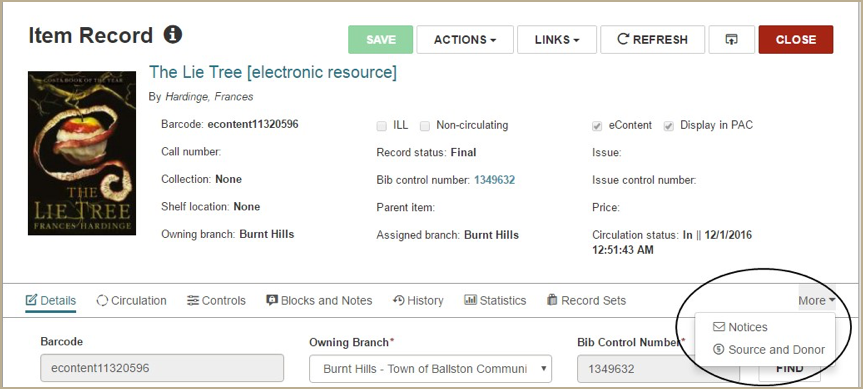
More Menu Added
The Notices view and the new Source and Donor view of the Item Record workform are available under the new More menu.
-
New Details View
The Item Record workform contains a new Details view for modifying header information.
-
Editable Fields on the Controls View
If you have the required permissions in Polaris Administration, you can now edit fields on the Controls view of the Item Record workform.
-
Editable Fields on the Notes and Blocks View
If you have the required permissions in Polaris Administration, you can now edit fields on the Notes and Blocks view of the Item Record workform.
-
New Source and Donor View
The Item Record workform includes a new Source and Donor view under the new More menu.
-
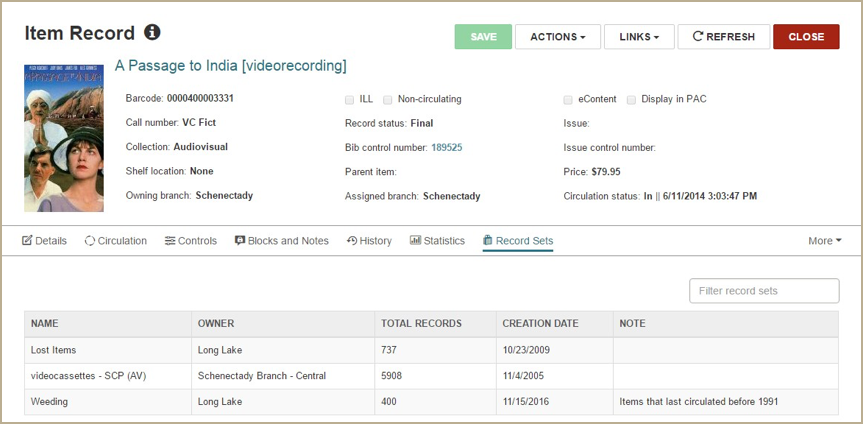
New Record Sets View
The new Record Sets view of the Item Record workform displays a table listing all the record sets to which the item record belongs. You can click on a record set to open the Item Record Set workform. When you close the workform, you are returned to this view. If you do not have the required permissions for the record set, an error message appears.
The linked item record sets are displayed in the following columns:
Name
Owner
Total Records
Creation Date
Note
-
Info Icon and Properties Window
The information icon and properties window were added to the Item Record Workform. When you hover over the information icon, the Item Record Properties window appears.
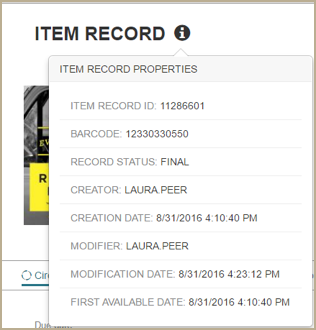
The Item Record Properties window displays the following information:
Item Record ID
Barcode
Record Status
Creator
Creation Date
Modifier
Modification Date
First Available Date
Hold Request Updates
The information icon and properties window were added to the Hold Request workform. When you hover over the icon, the Hold Request Properties window appears.
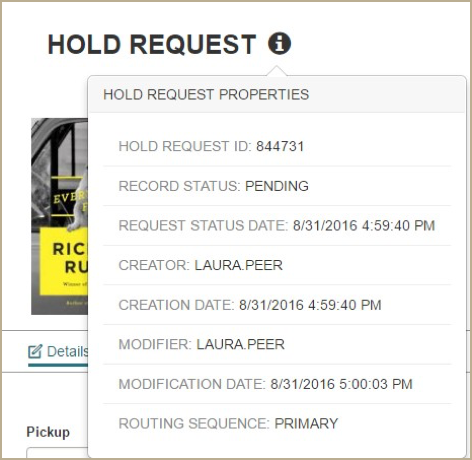
The Hold Request Properties window displays the following information:
Hold Request ID
Record Status
Request Status Date
Creator
Creation Date
Modifier
Modification Date
Routing Sequence
Bibliographic Record Workform Updates
The following updates were made to the Bibliographic Record workform.
-
Information Icon and Properties Window Added
The information icon and properties window were added to the Bibliographic Record workform. When you hover over the information icon, the Bibliographic Record Properties window appears.
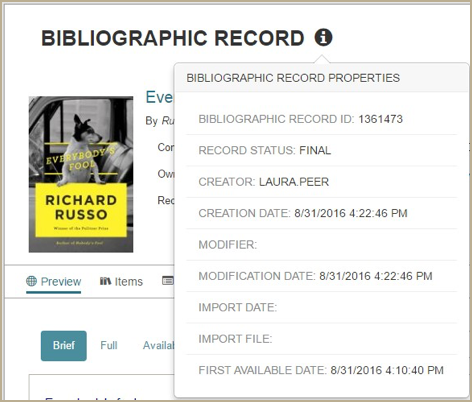
The Bibliographic Record Properties window displays the following information:
Bibliographic Record ID
Record Status
Creator
Creation Date
Modifier
Modification Date
Import Date
Import file
First Available Date
-
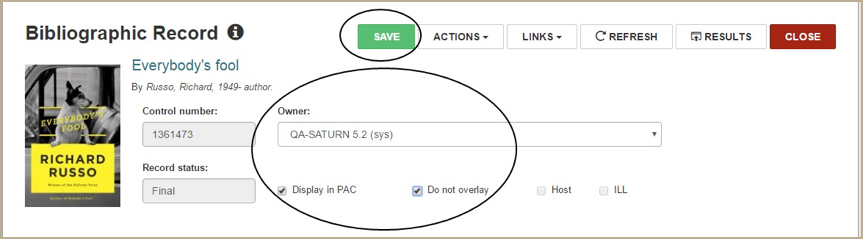
Editable Header Fields and a Save Button
If you have the required permissions, you can now edit the following header elements on the Bibliographic Record workform:
Owner
Display in PAC
Do not overlay
You can then click SAVE to save the bibliographic record.
-
Actions Menu with Create Item Record Option
The ACTIONS menu in the workform header now includes the Create Item option.
-
New Item Button on the Items View
The Items view now has a NEW ITEM button that you can click to add a new item linked to the bibliographic record.
-
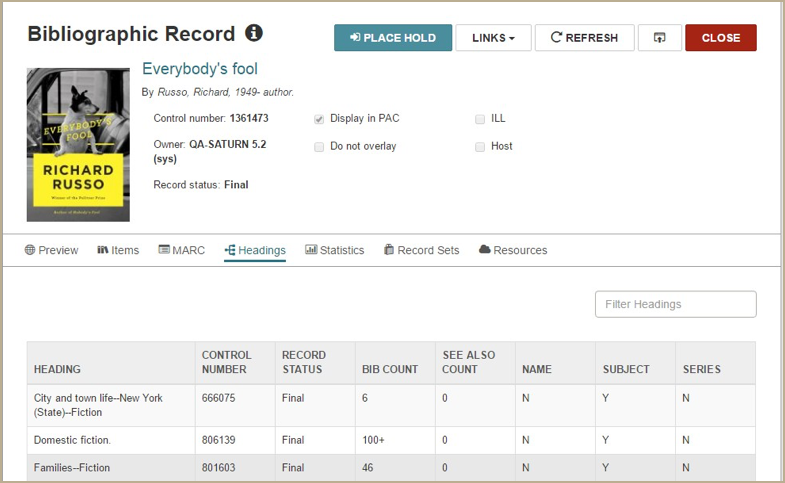
New Headings View
The new Headings view of the Bibliographic Record workform displays the headings linked to the bibliographic record in the following columns:
Heading | Control Number | Record Status | Bib Count | See Also Count | Name | Subject | Series
When you click Headings, the following message appears if there are no linked authority records: No authority headings exist for this record.You can click a heading to go to the linked authority record. When you close the linked authority record, you return to this Headings view.
-
New Record Sets View
The new Record Sets view of the Bibliographic Record workform displays a table view of any record sets to which the bibliographic record belongs. The linked bibliographic record sets are displayed in the following columns:
Name
Owner
Total Records
Creation Date
Note
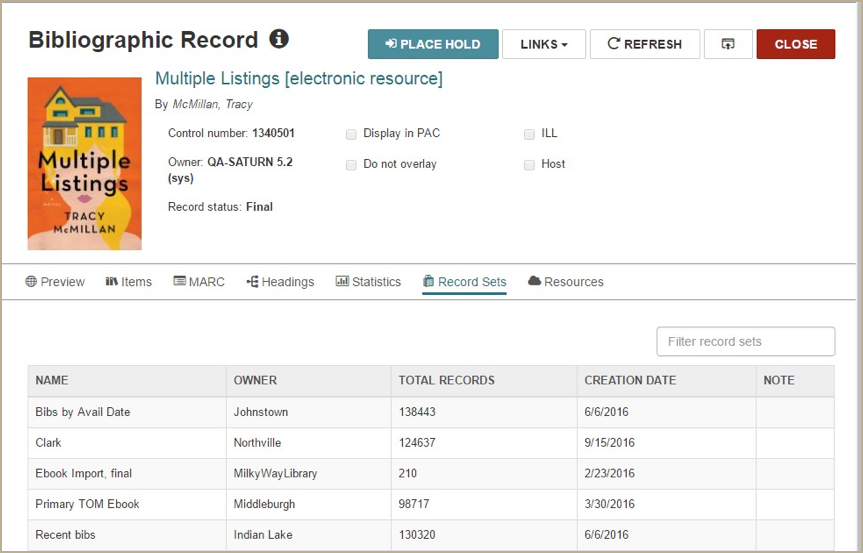
All record sets appear in this view regardless of ownership. However, you can access only those record sets for which you have the required permissions. If you do not have permission, the following message appears: You do not have ownership rights to open this record set.
You can click on a record set to open it in the Bibliographic Record Set workform. When you close the workform, you return to this view.
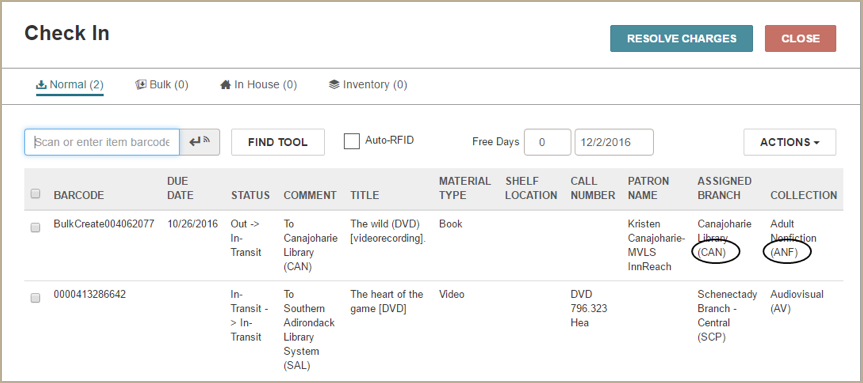
Check In Workform Updates
The following updates were made to the Check In workform.
-
Count of Checked-In Items
The Check In workform displays a count of the checked in items in all modes (normal, bulk, in-house, and inventory).

-
Branch and Collection Abbreviations
On the Normal and Bulk views of the Check In workform, the branch abbreviation appears along with the branch name, and the collection abbreviation appears along with the collection name.
Picklist Updates
When an item is declared missing from the Picklist in Leap, a new item record history action Circulation status modified via Picklist processing is posted to the Item History.
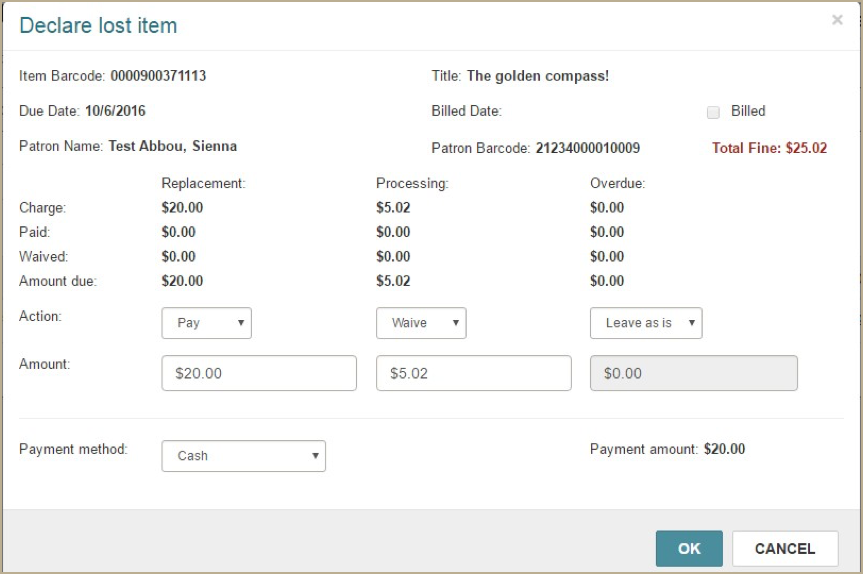
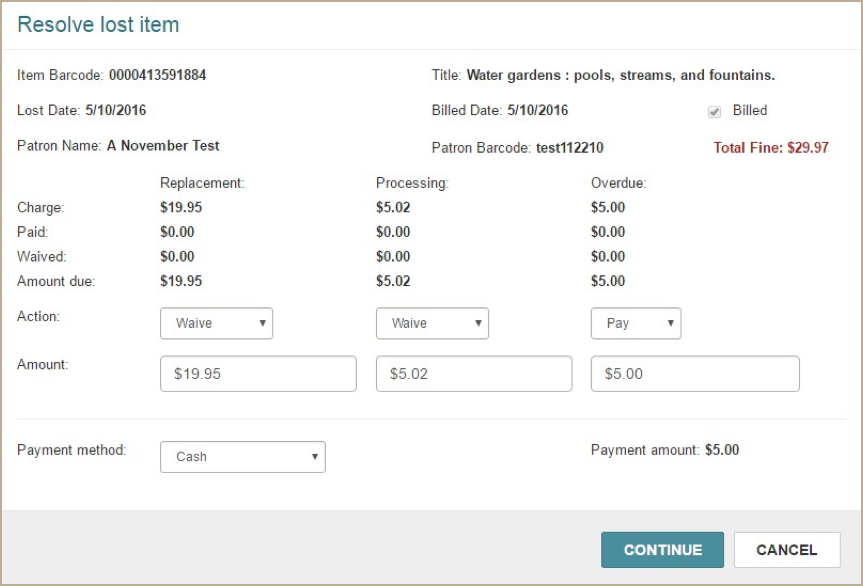
Declare Lost Item and Resolve Lost Item Updates
The Declare lost item and Resolve lost item dialog boxes were updated to improve the user experience. On both dialog boxes, elements were repositioned, and a new Payment amount element was added.
The payment amount equals the amount of money the staff member expects, based on the actions selected and amounts displayed. If the amount expected is $0.00, the Payment method cannot be selected and the Payment amount field displays $0.00.