
New Features List
Circulation & Cataloging
"You Saved" Message on Check-Out Receipts
Displays the value of library service on receipts
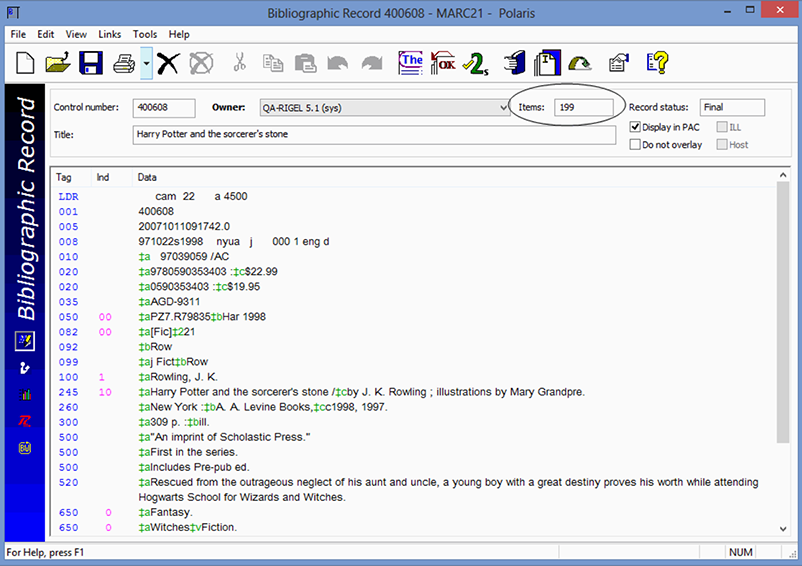
Bibliographic Record Displays Number of Linked Items
Linked items now displayed on bib records
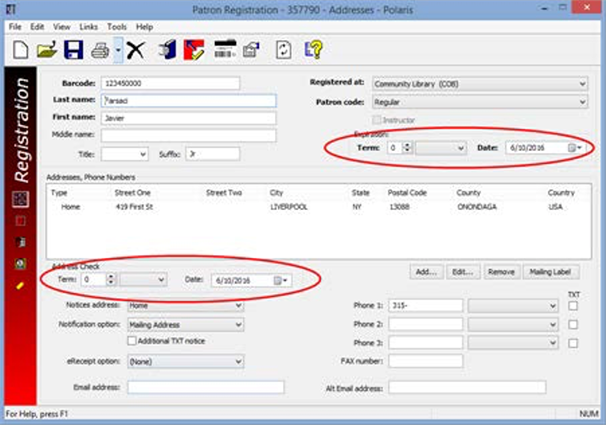
Updating Patron Registration Check Dates
New way to update the address check and expiration dates simultaneously
New ILL Report for Unclaimed ILL Items
Only for libraries using the ILL product
Acquisitions
SimplyReports
PAC
New and Updated Type of Material (TOM) Definitions and Icons
New easier to distinguish icons in the PAC
Integrated Eontent from 3M Rebranded
3M changed to Cloud Library with a new icon
Cloud Library Titles Excluded from Reminder Notices
New option to send reminder notices for Cloud Library titles
PAC Title List Improvements
Several improvements to working and saved lists in the PAC
Placing Bulk Hold Requests in the PAC
New feature to place up to 10 holds at once from working or saved title lists
PAC Requested Titles Indicator
New field in the PAC indicating that you have placed a hold on the item
Availability and Assigned Branch Facets in PowerPAC Narrow Your Search
New option to limit search to only available items
New PAC Web Link Icon
A new icon was added indicating a link to an external web resource
Circulation & Cataloging
"You Saved" Message on Check-Out Receipts
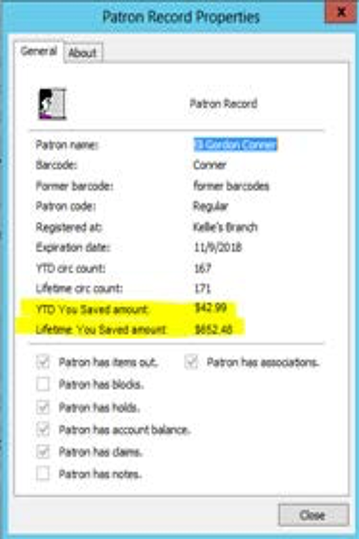
A "you saved" message has been added to printed check-out/renewal receipts and printed Items Out list. The message helps to remind patrons of the value of library service by displaying how much it would cost to purchase the items. It includes the total value of the current receipt transactions, the value of the patron's year-to-date transactions, and the "lifetime" value of all the patron's transactions.
The value for each item is calculated based on the price stored in the item record. If the item doesn't have a price, the Replacement Fee default value for that material type is used.
Year-to-date and lifetime savings values are available in the patron record properties sheet. You can view the properties sheet by pressing F8 while on a patron registration or status window.
Bibliographic Record Displays Number of Linked Items
The Bibliographic Record workform now displays the number of linked items in the header.
Updating Patron Registration Check Dates
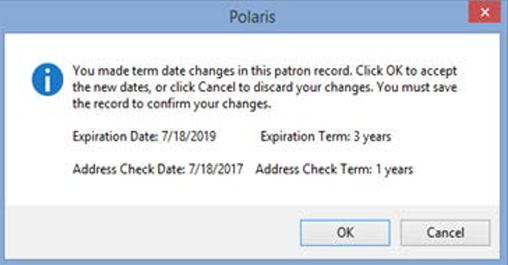
You can now update the Address Check and Expiration dates for a patron record simultaneously from the Patron Registration workform.
On the workform toolbar, select Tools, Update Check Dates, or press CTRL + U. A message box appears.
The new dates are based on the default parameters set in your account. When you click OK on the message box, the new dates are displayed in the appropriate fields on the Patron Registration workform. Save the record to confirm the updates.
As in previous versions of Polaris, you can also set new Address Check and Expiration dates separately in the Patron Registration workform.
Address Check and Patron Registration Expiration Blocks will now be removed immediately after they have been updated.
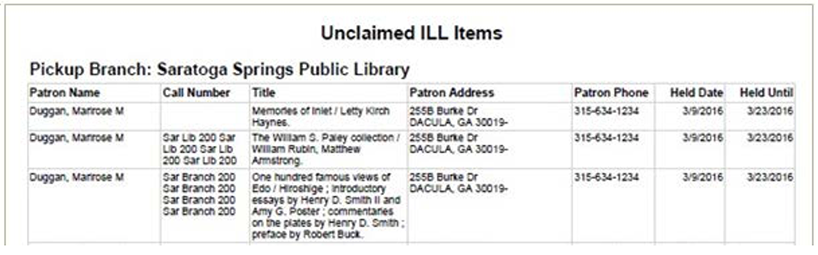
New ILL Report for Unclaimed ILL Items
Libraries using Polaris ILL processing can run a new report to list all held ILL items that have exceeded their Held Until date and need to be returned unclaimed to the lending library.
The report is located under Utilities / Reports and Notices / Circulation / ILL. It lists the unclaimed ILL items with a HoldTillDate less than the date on which the report was generated.
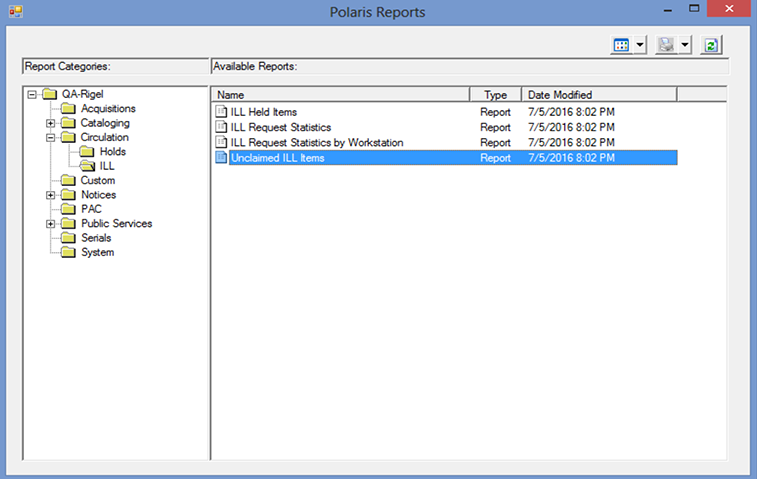
The report is sorted and grouped by the pickup branch.
Acquisitions
Modify a Purchase Order After Release
Staff members with the appropriate permission can now make changes to a purchase order line item and line item segments after the purchase order has been released. You can make two types of changes:
- Change a header fund and material type on a PO line item for all PO line item segments
- Change the fund, destination branch, and/or collection for an individual PO line item segment
Your changes are also reflected in any linked items and open invoices.
-
Change the Header Fund or Material Type for a Purchase Order Line Item
Staff members with permission can now use the new Tools menu option, Change Fund, Material Type, on the Purchase Order Line Item workform to replace an existing fund with another fund for all line item segments and/or change the item material type for the line item. This option is available for Purchase Order Line Items with a status of On Order, Partly Rec, Received, Backordered, Exceptional Condition, Never Published, Not Yet Published, Out of Print, Return Requested, or Returned. Any linked invoices must be Open to reflect the change.
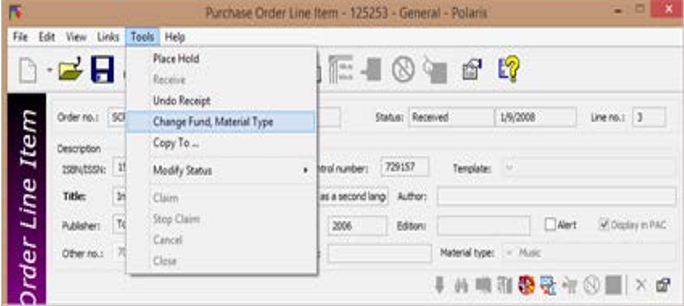
When you select the Change Fund, Material Type option, the Change PO Line Item dialog box opens.
-
To change the fund:
1 In the From section, select the current fund from the drop-down list. The list consists of the funds linked to all the PO line item segments in the line item. (The Fund Owner field is blank until a fund has been selected.)
If a segment is linked to two or more funds, the funds do not appear in the list unless they are also used in another segment. You cannot change the fund for segments linked to two or more funds with this method.2 In the To section, select the new Fund from the drop-down list. The list displays funds based on the settings in the Acquisitions/Serials profile Acq fund droplist setup for the logged-on user.
3 (Optional) In the To section, select a Fund Owner from the drop-down list to filter the Fund list. The list displays organizations based on the setting for the Acquisitions/Serials profile Filter branches in line item segments for the organization listed in the purchase order's Ordered At section.
4 Click OK. A confirmation message appears if the change can be made.
If the change cannot be made, the system displays a message: One or more segment statuses are ineligible, are split across funds, or they are linked to paid invoice lines. Click OK to return to the Change PO Line Item dialog box and edit your changes, or click Cancel and make your changes by editing a PO line item segment directly.5 Click OK to confirm the change, or click Cancel to cancel it.
When a fund change is successful, the system replaces the old fund with the new one in all affected PO line item segment(s). For each segment, the system records a disencumber transaction in the old fund and an encumbrance transaction in the new fund. The funding source field is also updated in the linked on-order items, and the funds are changed in the linked invoice line item segments.
The current material type is displayed in the Material Type box. To change the material type:
1 In the To section of the Change PO Line Item dialog box, select the new Material Type from the drop-down list.
2 Click OK. A confirmation message appears if the change can be made.
3 Click OK to confirm the change, or click Cancel to cancel it.
When a material type change is successful, the new material type is saved for the PO line item and linked on-order items. The item history is also updated.
PAC
New and Updated Type of Material (TOM) Definitions and Icons
Several new and modified bibliographic Type of Material (TOM) have been added. TOMs are used in many displays and search filters in Polaris.
New TOM Definitions Added:
 Atlas
Atlas
 Audio Book on Cassette
 Audio Book on CD
 Blu-ray + DVD
 Book + DVD
 Emagazine
 Streaming Music
 Streaming Video
 Video Game
 Vinyl
Vinyl
Changed TOM:
AudioEbook was renamed Eaudiobook
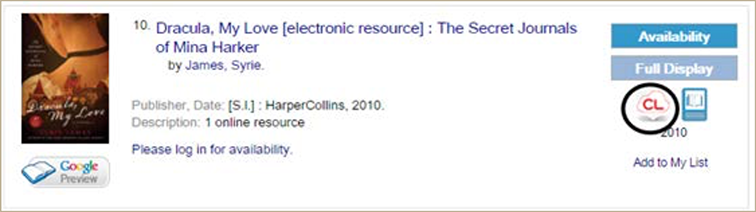
Integrated Econtent from 3M Rebranded
As a result of vendor changes, the name and icon that identify integrated econtent from bibliotheca's 3M Cloud Library have changed in PAC displays. The new name is Cloud Library, which is displayed as hover text over the new icon in PAC search results. The following is an example of the icon in Polaris PowerPAC:
Cloud Library Titles Excluded from Reminder Notices
By default, all Cloud Library (eContent) titles are excluded from almost overdue reminder notices. You now have the option to include these titles in the almost overdue reminder notices. Make requests to add them through the Helpdesk.
PAC Title List Improvements
Working and saved title lists in PowerPAC have been improved in several ways.
-
Selecting Multiple Titles
Patrons can easily select individual and multiple titles in working and saved lists. In Polaris PowerPAC, a check box appears next to each title in a logged-in patron's working or saved title list. The user can check single or multiple titles to place a hold request or take other actions (copy, move or remove) on the selected title or titles. A Select Page check box is also added to the top of and bottom of the page in Polaris PowerPAC. When you select this checkbox. All titles on the current page are checked.
The Copy, Move, and Delete buttons have been moved to the bottom of the page, and renamed Copy selected to, Move selected to, and Remove selected.
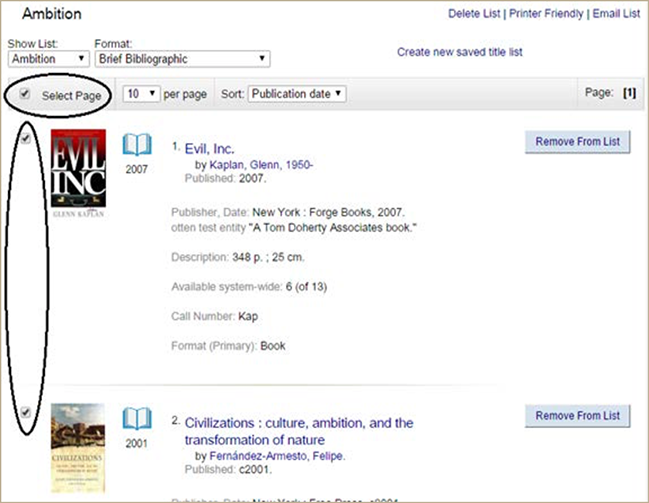
You can select single or multiple titles and click the appropriate button to take the same action on all the selected titles. (If no titles are selected, the buttons are disabled.) In addition, a Remove from list control has been added to individual titles on working and saved title lists when displayed in Brief Bibliographic or Full Bibliographic format. You can click Remove from list to remove a single title without first selecting the check box.
-
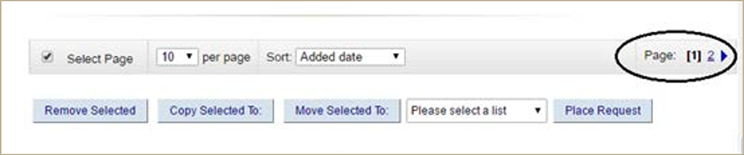
Paging
Paging has been added to PowerPAC title lists. You can opt to display 10 (the default), 20, 30, 50, or 100 titles per page form a drop-down control at the top of the list.
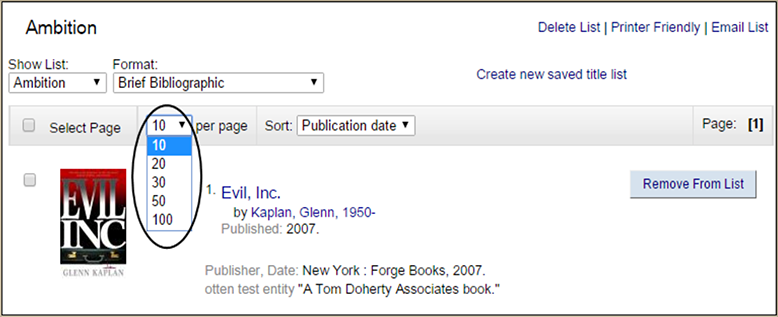
Paging controls are available at the top and bottom of multi-page lists.
-
Sorting
You can now sort the brief and full views of working and saved title lists by date added to list (the default), author, publication date, or title. When you select a new sort order, the entire list is sorted even if it extends to multiple pages; the page refreshes and you return to the first page of the list. The selected sort order is retained in the output file when you select print, email list, or save to disk.
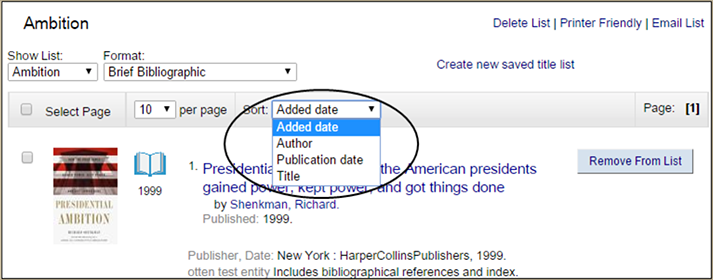
If you select the Chicago Manual of Style or APA format, the list is sorted according to the rules of those style guides, and that order is retained in the output file for print, email, or save to disk. If you switch back to the brief or full view, the sorting order is the one most recently selected for those views.
When a logged-in patron selects a sort order in a saved title list, the sort order is retained the next time the patron logs in, and any titles added to the saved list are correctly sorted for that list.
-
Availability Information Updated in Real Time
Availability counts and availability details on working and saved title lists are now automatically updated to reflect real-time data whenever the user displays the list. Previously, availability information was captured when a title was first saved to a list but was not subsequently updated.
-
Bib Data Updated in Saved Title Lists
When a bibliographic record is changed, the change is now automatically reflected in any saved titles lists where the record appears.
-
Printing and Emailing Title Lists
When you click Printer Friendly or Email List on a working or saved title list, titles from the current page only are displayed in the printer-friendly view. You can click Print Page, Save Page to Disk, or Email Page to take action on the current page, or click the new option Email all to, which emails the entire list to the designated address.
Very long emails may exceed system or email service limits that prevent successful delivery. The system displays an alert message for large lists.
-
Record Limits Changed
Working title lists are now limited to 100 titles (was 1,000). If the patron clicks Add to My List in this case, the system displays a message: "The working list has reached the maximum number of titles allowed. To make a larger list, please make a saved title list."
Placing Bulk Hold Requests
In Polaris PowerPAC, the logged-in patron checks at least one title in a working or saved title list and clicks Place Request.
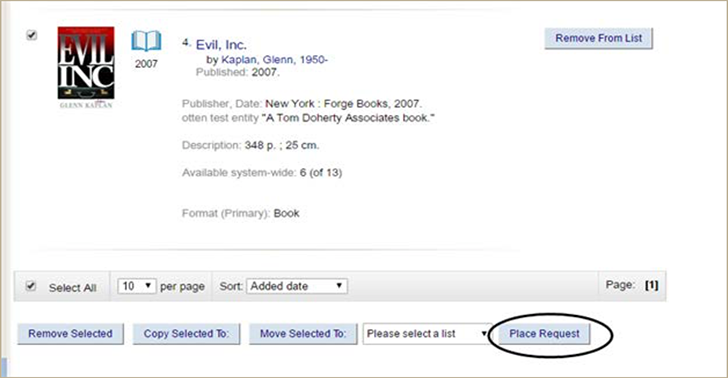
The Place Request button is disabled if the patron has not selected at least one title in the list. If the patron has selected more titles than allowed, the system displays a message: "You can only place 10 holds at once. Uncheck one or more titles and try again."
When the patron's selections meet the bulk hold limit and the patron clicks Place Requests, the Place Requests page is displayed. The patron can set an activation date and pickup library.
When the patron clicks Continue on the Place Requests page, the Confirm Bulk Requests page appears.
The list displays the selected titles, and for each title, the material types of the items that can potentially satisfy the request. The list can be sorted by clicking a column header. Titles with check boxes can be unchecked if the patron does not want them. Titles without check boxes in the display cannot be requested at all, either because they are from remote databases, they are duplicates, they represent integrated eContent (Cloud Library), the bibliographic record has been deleted but not yet removed by overnight processing, or due to item-related or patron- related conditions. A message specific to the error displays under the title of each request.
When the list is satisfactory, and after the patron has clicked Update to save any changes, the patron clicks Confirm. When processing is complete, the system displays the Bulk Requests Results page with the message: Your requests were successfully placed!
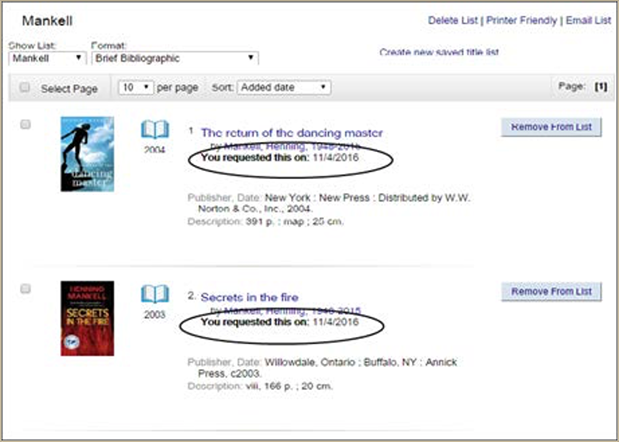
PAC Requested Titles Indicator
A new "Requested" indicator has been added to Polaris PowerPAC and Mobile PAC for titles on which the patron has an active, pending, held, shipped, or located hold request. The indicator is displayed to logged-in patrons on the search results page, the full display for a title, the working title list, and saved title lists. The example shows the requested indicator in a saved title list.
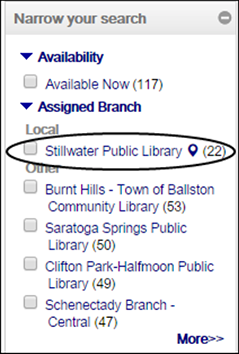
Availability and Assigned Branch Facets in PowerPAC Narrow Your Search
A new availability facet under the Narrow Your Search panel in PowerPAC has been added. Used in conjunction with the improved Assigned Branch facet, your patrons can now filter their search results to identify items that are available anywhere or at specific branches. Item availability for most titles is updated in real time and the number of titles that will be in the search results list if Available now is selected is displayed.
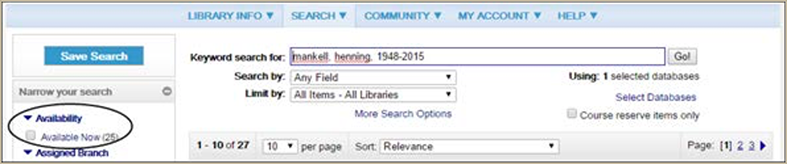
A branch appears in the Assigned Branch list only if it has at least one item on at least one title in the search results. Organizations are listed first by your library and then in descending order by the number of titles that will be retrieved if the facet is selected.
A title is available when these conditions are met:
-
Display in PAC is checked in the bib record, and either:
- There is at least one linked item record where the item record status is Final, and
- The item circulation status is In, and
- Display in PAC is checked in the item record
- Or Display in PAC is checked in the bib record, there is an issue record, the issue is not linked to an item, and the issue is linked to a subscription Serial Holdings record and is retained.
When the patron checks Available Now, but does not check an Assigned Branch facet, the search results list is filtered to display all the titles that meet the requirements for displaying in the PAC and have at least one item record that is "available".
If the patron checks both Available Now and an Assigned Branch facet, the search results list is filtered to display only the titles that meet all current requirements for displaying in the PAC and have at least one item record that is available at the selected assigned branch.
The Available now facet can also be combined with the Limit By drop-down list filters.
New PAC Web Link Icon
![]() This new icon replaces the globe icon to indicate a link to an external web resource.
This new icon replaces the globe icon to indicate a link to an external web resource.
![]()
New SimplyReports Features
Editing Saved Reports
You can now edit all column and filter settings for saved Bib, Item, Patron, Patron Account, and Holds List and Count reports. To edit a saved report:
1 Select the My Reports tab, and select the My reports subtab.
2 Select the type of report you want to edit in the Select one or more report types box. The saved reports of this type are listed.
3 Select the check box next to a report in the list of saved reports.
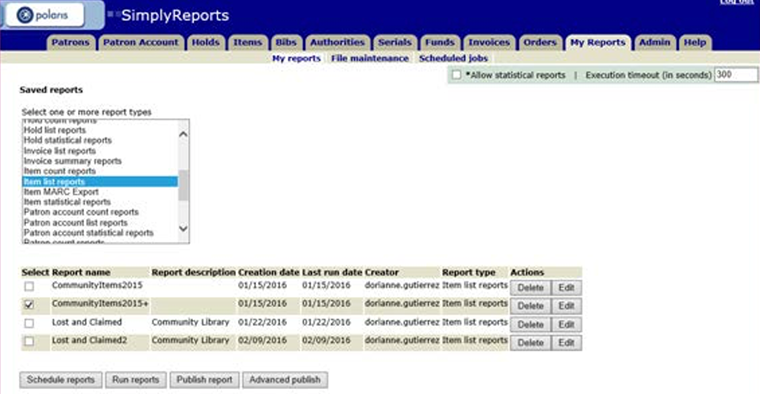
4 Click Edit under Actions. A message asks if you are sure you want to edit this report. If you want to continue, click OK.
The tabbed page for the selected report type opens. The report information at the top of the page is blue to indicate that you are editing a saved report. The filter options are expanded, and column and filter options are displayed with the options set as they were when the report was saved.
5 Change the column and filter selections as desired.
6 Click Continue. The report Preview window opens.
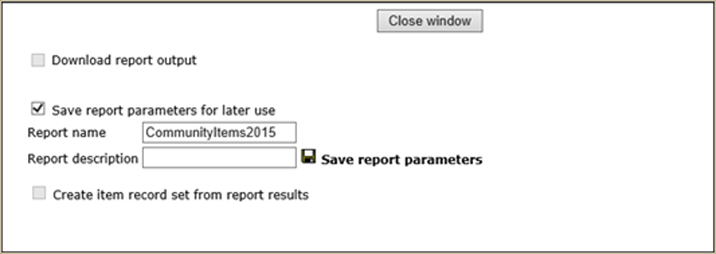
7 Leave the report name unchanged to overwrite the previous version of the report, or type a new name for the edited report.
8 Click the Save Report parameters icon to save your edited report.
-
Last Run Date Updated for Manual Report Runs
In previous versions, the last run date for a saved report was updated only when a scheduled report ran automatically. The last run date is now updated when you run the report manually as well as when it runs automatically.