
Printing in Polaris will not work if you haven't downloaded the appropriate programs to your computer.
Please follow: Preparing your computer for Polaris before proceeding with the rest of these steps.
A. The printer should be recognised and printing on your computer.
B. Setting the workstation to print receipts and slips:
This procedure needs to be done only once for each workform from which you want to print, unless you want to change your settings. Follow these steps on each workstation to set Polaris to print receipts and slips from one or more workforms.
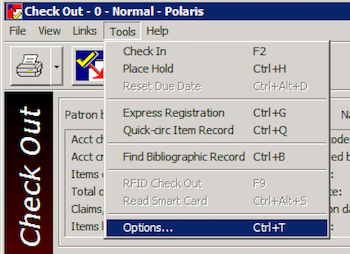
- Open the appropriate workform from the Polaris Shortcut Bar:
- Check Out workform - Select Circulation, Check Out.
- Check In workform - Select Circulation, Check In.
- Note: Check-in receipts that list the items checked in for a patron or group of patrons do not print automatically, but are available for manual printing from the workform.
- Request Manager workform - Select Circulation, Request Manager.
- Hold Request workform - Select Circulation, Hold Requests. Find and open the hold request.
- Patron Status workform - Select Circulation, Patron Status. Find and open any patron record .
- Item Record workform - Select Cataloging, Item Records. Find and open any item record.
- Outreach Services Manager workform - Select Patron Services, Outreach Services.
- Receive Shipment workform - Select Acquisitions, Receive Shipment.
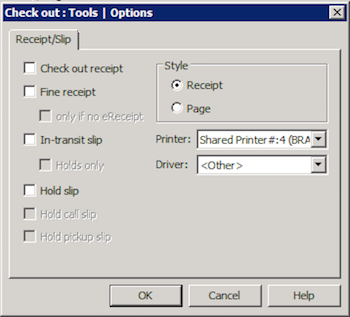
- On the workform, select Tools, Options... to display the Tools Options dialog box. The Receipt/Slip tabbed page appears.
- Important: Complete the Tools Options dialog box from each workform where you want to print receipts or slips. For example, if you want to print fine receipts when you are checking in items and when you are renewing items at the Patron Status workform - Items Out view, do this step for both the Check In workform and the Patron Status workform.
- Select one or more of the following receipt/slip check boxes:
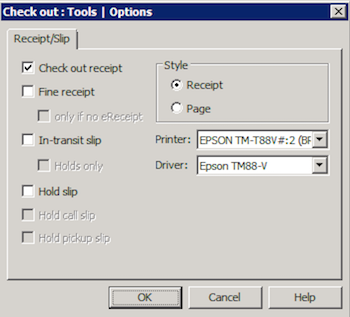
- Check out receipt
- Fine receipt - Select Fine receipt to print fine receipts from this workform. If you check only if no eReceipt, fine receipts are printed only when the patron does not receive eReceipts. If only if no eReceipt is not checked, printed receipts are produced in addition to eReceipts for patrons who receive eReceipts.
- In-transit slip
- Note: Select In-transit slip if you want to print the slip when an item’s status changes to Transferred (because it will fill a hold and needs to be sent to the pick-up library) or In Transit (because it belongs to another library). If you want to print the slip only when an item’s status changes to Transferred, select (check) Holds only.
- Hold slip
- Hold call slip (available if this option is enabled for your library)
- Select one of the following printer Style options:
- To use a receipt printer, click Receipt.
- To use a page printer, click Page.
- Note: You can customize the message text that appears on all receipts.< >Set receipt printer message text
This procedure only needs to be done once unless you want to change your settings. Follow these steps to set a standard message that appears on check-out and fine receipts generated from the Polaris staff client and check-out receipts from Polaris ExpressCheck.Select Circulation, Options from the Polaris Shortcut Bar.
The Circulation Options dialog box appears. - Select the Receipt Printer Options tab.
The Receipt Printer Options tabbed page appears. - Type your custom message in the Message text area.
The custom message will be used by all workstations
registered to your current log-on branch in Polaris
Administration. - Click OK on the dialog box.
- Note: You can customize the message text that appears on all receipts.< >Set receipt printer message text
- Select the appropriate network printer in the Printer box.
- Note: If you are working offline in a terminal server environment, you may need to set up receipt printing again if you switch terminal servers. Check the printer setting to be sure the appropriate printer is selected.
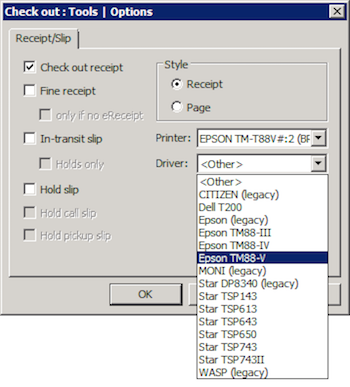
- If you use a receipt printer, select the printer and appropriate printer driver in the Drivers box.
- Click OK on the dialog box.
- Repeat this procedure for each workform from which you want to print receipts or slips.
Receipts Available
For each circulation workstation, you specify which receipts and slips should print from specific workforms, whether to use a page or receipt printer, and which printer should be used. Polaris provides the following kinds of circulation receipts and slips:
- Check-out/renewal receipts list the items checked out or renewed for a patron. Check-out receipts can be printed from the Check Out workform; renewal receipts can be printed from the Check Out workform and the Patron Status workform - Items Out view. Receipts print automatically from the Items Out view unless you suppress them for that workform.
- Check-in receipts can be manually printed from the Check In workform, Normal and Bulk views. When a patron’s items have been checked in, you select one or more items in the list and select File, Check in receipt. If items are selected from multiple patrons, the items are grouped by patrons, and three blank lines are added at the end of each group.
- Fine receipts list the fines paid or waived for overdue items, replacement items, and other fees for a patron. Fine receipts are printed automatically from the following locations:
- Check In workform - Normal view (Check In - Fine dialog box)
- Patron Status workform - Items Out view (Overdue Fine dialog box)
- Patron Status workform - Account view (Pay and Waive dialog boxes)
- Declare lost item dialog box
- Item Record workform
- Hold slips/hold call slips are printed automatically when an item’s status becomes Held at the Check In workform, Check Out workform, Item Record workform, Patron Status workform - Items Out view, Hold Request workform, or Receive Shipment workform. Polaris provides different types of hold slips:
- Default hold slip - Prints automatically when an item’s status becomes Held at a circulation transaction. Libraries typically place the hold slip with the held material for identification purposes.
- Hold call slip - For libraries that call their patrons for held items. It includes extended information and is laid out so that the title information is exposed when placed in a book.
- Appended pick-up slip - The pick-up slip can be appended to the default hold slip, the hold call slip, or both. With this option, both slips are printed together so the information needed for processing is available on the standard hold slip or hold call slip, and the pick-up slip portion can be torn off and placed with the item. The combined slips are printed when the Print hold slip or Print hold call slip option is selected from the Tools, Options menu in the circulation workform. (If you select Print hold pickup slip, the pick-up slip is printed alone.)
- In-transit slips are printed automatically when an item’s status changes to Transferred (because the item will fill a hold and needs to be sent to the pick-up library) or In Transit (because the item belongs to another branch), and when you transfer an item for a hold from the Hold Request workform. You can place the in-transit slip with the item to be sent to the other branch. You can also choose to print an in-transit slip only when the item status changes to Transferred because it will fill a hold.
- ILL slips are printed automatically when an interlibrary loan item is received on the Request Manager workform - ILL Requests view. Libraries typically place the ILL slip with the material for identification purposes.
- Offline receipts record the items checked out or renewed for a patron offline. The offline Check In workform list view can also be printed on a receipt or page printer.
Related Information
- Optional check-out receipts - To conserve resources, your library may opt to print a check-out receipt only when the patron requests one. If the library has set this option in Polaris Administration and you have set check-out receipt printing for the workform, instead of automatically printing a receipt at the end of the check out or renewal process, a prompt to print the receipt is displayed and you can ask the patron if he wants a printed receipt.
Note: The receipt prompt is not displayed for renewals from the Patron Status workform - Items Out view. You can optionally print a “receipt” from this view by suppressing check-out receipt printing from the workform Tools options, and then printing receipts on demand by printing the Items Out list (CTRL+ALT+P). The library can specify the information included in the printed version of the Items Out list.